Showing posts with label airbrush. Show all posts

May 22, 2024

Native American Dakota nation chief quote


This work I started as an analog airbrush with a physical airbrush gun and real paint on a T-shirt, that I photographed and edited extensively (adding plenty detail) in Affinity Photo many years later. I appreciate the Ctrl+Z and History of digital tools to get things closer to where the image is in my mind (without getting my fingers covered in paint). Digital art creation in my view is in no respect inferior to the traditional analog way of conceiving. It takes effort to reach the point where artists want to be, the tools they use are just different.


Most recent edit in Affinity Photo


In the early 90's of the previous century I discovered CorelDRAW as an amazing tool. Later I fiddled with Inkscape, after which I worked with Adobe Illustrator, Photoshop and InDesign on a professional basis. When Adobe started their ridiculously costly subscription model, I discovered Affinity suite and switched to those programs. Most recently I ran into the magnificent VectorStyler, so I guess I evolve along with the tools that become available to artists that are continuously looking for tools that help them express what is in their mind.


Click the image to see a larger version in Google's Lightbox


Halfway the 80's of the previous century I happened to run into a Native American lady of the Comanche nation, who lived on the edge of an Indian reservation, who told me a lot of her culture and what life is like in her area. It is nowhere near to the fake representation that the Hollywood moguls prefer to offer to the public. To unassuming people that live in a comfortable place in the West, it is bizarre and mind boggling what life is like in a place bordering a reservation. Even to those, like me, who live in a way that sets themself apart from most of the the common people in their area. In spite of the difficulties that minorities are forced to deal with, the spiritual wisdom of their ancestors remains lingering in the minds and hearts of their offspring.


October 17, 2022

Einstein analog / digital portrait


This is a proverbial combined freehand airbrush / Affinity Photo portrait of One Stone a.k.a. as Einstein, the relativity bloke. The man that urged Roosevelt to develop nuclear arms, that the US used to bomb Japan (twice) when the outcome of WW-II was already decided. In a long lost past I used to take up the airbrush gun and spray paint on different kinds of surfaces. With one or two exceptions always worked freehand, i.e. without any masking. 

Today, I work in the digital realm mostly, because it is convenient, less of a hassle and - most importantly - corrections are relatively easy to make in less time than is the case with an analog airbrush. I do sometimes however pick up the trusted Iwata or Harder & Steenbeck airbrushes to get my mind off things I need the time to process in a proper way; the old way of airbrushing works better to do such a thing than the digital stuff.

I used the Iwata HP-BH airbrush to spray the Inspire H2O paint on an old piece of paper that I had laying around. Very low air pressure, thinly diluted paint and Chillhop music to drift away, but not too far to be unable to do anything useful. To be honest, I like the HP-BH more than the Custom Micron, probably because I like different things better than what commonly is considered to be the best of the best. I was forced to buy the HP-BH on an airbrush show, after one of the visitors had stolen my Paasche V1 - which was the best tool ever - when I took a break and left the V1 unattended on the easel.

I dropped the HP-BH on the floor and because I never use the back cover of airbrushes, the needle was driven into the nozzle quite hard. I had to get it out using a pliers, because it was firmly stuck. However, the HP-BH kept on spraying like it never happened and I used the same needle and nozzle for years after the incident without any problem. I would not recommend hammering the needle into the nozzle before use, but I became convinced of the high quality of Iwata airbrushes.

Being a senior geezer, when finding an old airbrush painting, I see mistakes I made and correct them in Affinity Photo - a digital photo editing program, that resembles Photoshop, but is much much cheaper and equally as good or better. Check out my pixel paintings and vector portraits in my VectorWhiz website that you find here. Most recent stage at the top, older ones in chronological order, below it.


Digitally edited in Affinity Photo


On my DIY vertical light table


Analog airbrushed with Iwata HP-BH


Analog airbrushed with Iwata HP-BH


Early stage


September 25, 2019

Changing Native American portrait

I used to airbrush a lot - the analogue type in which a real metal airbrush is hooked up to a compressor to spray real paint on a real surface. That started in the early 80's of the previous century and lasted until approximately 8 to 10 years ago. After that I became more interested in digital image creation and manipulation, also because the programs became better and allowed to approach the quality that traditional airbrushing did. Today, the quality of the digital image creation programs has surpassed the traditional way of working in the sense that it is able to create more accurate detail that, in addition, can be edited endlessly.

I used to mainly use CorelDRAW and Corel PhotoPaint for my personal projects and during the day worked professionally with the Adobe products in the office. Sometimes I used Illustrator and Photoshop for my personal projects as well, but I always found their programs way overpriced. Things got worse when they imposed their subscription model on their users after which I switched to Serif's Affinity Designer (vector drawing program) and Affinity Photo (pixel creating and editing program). I accidentally ran into these programs when aimlessly browsing the Internet.

I've truly fallen in love with the Affinity programs that both cost about 50 USD that give you ownership of the programs and 3 free updates.... That is a whole lot more affordable than the programs in the Adobe suit. Designer and Photo are developing well - bugs are continuously removed and functions are added - which causes them to almost be on par with AI and PS functions wise, while having surpassed them in a certain number of aspects. I may elaborate on this in a future blog entry. In addition Serif issued Affinity Publisher which is and InDesign competitor. Already now Publisher is sufficiently equipped with functions to do by far the most DTP work very well while only lacking compared to ID in very specialist areas like interactive digital publications for instance. But artists that work in that type of document creation are relatively small numbered.

OK, back to what I was going to express here. Sometimes when I get bored, I tinker with images in Affinity Photo. In the old days I used to airbrush a lot of portraits of Native American people. But when browsing the web, it occurred to me that many artists create portraits of the same people, simply because there weren't too many photographers to record faces of Native American people in the old days. In order to create a unique face one has to be created from scratch or an existing one has to be changed so that it looks nothing like the original, trying to preserve the ethnic facial traits of the subject. Gertrude Kasebier and Edward S. Curtis are two of the best known magnificent photographers who shot a large number of great Native American portraits. But in their day, it wasn't like everyone had a camera on their smartphone like people have these days. It is why a relatively small number of genuine photographs of Native Americans exist.

So when I find a photo of a Native American person that I potentially would like to airbrush, but I find elements in their facial traits that I would like to change, I load the photo into Affinity Photo and start tinkering. Some would say that this is historic fraud, which in fact is the case to a certain extent, but that could also be said of the paintings of the brilliant Howard Terpning who I am sure interprets some things according to his personal vision (which is what makes his art so awesome). Personally I enjoy watching Terpning's work. Perhaps a little more and focused on details than the average person, because I want to know where the beauty of art is hiding in the details.

Below you find a brief sequence of me changing a portrait that I found on the web. At the bottom is the original photo. Above that the alterations made in Affinity Photo - mainly using the Liquify Push Forward Tool in the Liquify Persona. The image above that shows more detailing done with the Paint Brush Tool (using a textured brush), The Blur Brush Tool and the Clone Brush Tool. I also used the Color Adjustment and Curve Adjustment filters to make the image more crisp and dramatic. Finally I placed the edited image in a frame in the 3D program Rhinoceros v5 as show in the image at the top. I enjoyed doing this piece of historic fraud that I think turned out quite well considering the original photo was small and of a low resolution (600 x 938 pixels), while damages were present both in the face and in the background.

Tip: click on one of the image and it will be displayed in Google's Lightbox. If you are on a PC (also possible on a Mac I presume) you can turn the scroll wheel of your mouse and flick through the images to compare them.


Placed the edited image in a virtual 3D frame


Image edited with Paint-, Blur- and Clone- Brush tools
to add detail and Colour and Curve Adjustment filters
to make the image more crisp and dramatic looking


Photo edited with the Liquify tool and
Blur tool to remove jagged edges on areas


Reference photo, which was small, low res,
damaged and jagged


May 22, 2019

Airbrushing that relativity bloke

I hadn't touched an airbrush for over two years, but picked up the tool again yesterday after a visit to Airbrush Services Almere that has redecorated their shop excellently. Not sure if I'll continue this old trade again, but it was nice to do. Therapeutic more or less. I used the Iwata HP-BH airbrush with Inspire H2O sepia paint on a canvas structured paper (Canson for oil- and acrylic paints). 100% freehand airbrush and some erasing with Faber Castell 7057 eraser pencil. No pencil- or hairy brush strokes added to enhance accents or add detail. I may be testing other airbrushes and paints while at the analog airbrush craft again.

The Canson paper is extremely strong and allows erasing (even with fiber glass erasers if done carefully) after which airbrushing over the erased area can be continued without a problem. In some places I sprayed Inspire white over the erased area before continuing airbrushing. That is somewhat similar to applying a layer of gesso onto which the portrait is sprayed. No spiders or absorption blobs due to too much paint accumulating in the damaged area where the paper surface was erased (which results in unwanted dark spots). Excellent!

This paper is well suited for artists who want their painting to have an authentic canvas effect, but in fact works a lot easier than real canvas.... It does not allow as meticulous details as on smooth paper, but real canvas doesn't allow too much detail either.

The H2O paint was I recalled it to be; the best a available on the market. Using reducer works better than mixing the paint with water. It makes the paint flow well, gives less clutter and keeps it usable / sprayable in the airbrush paint cup longer. In addition it allows erasing with more control. Finally it makes the airbrush easier to clean. These are properties not all paints combine.

For fine details I added Vallejo Flow Improver to the mix: paint : reducer : flow improver = 2 : 8 : 1 The Flow Improver really does its job well; add too much and the paint will slip (and cause 'spiders'), but it significantly extends the period in which very fine details can be sprayed or postpones clogging of paint in the airbrush. Nice stuff. Mind you, fine details are better applied on smooth paper or special airbrush board. Use low air pressure, push the trigger carefully to barely let paint come out and work very close to the surface (1 to 2 mm) with the air cap removed.

Oldest stage at the bottom, newest at the top. Hint: click on an image and you'll be taken to Google's Lightbox which is a type of slide show that allows you to scroll tbrough the stages (on a PC that is) for easy compare of the stages.


Really finished. 19:44 hrs June 11 2019
Only varnishing still needs to be done.


Finished. I think. 11:16 hrs
June 2 2019. Daylight photo


Further hair detailing 10:45 hrs
May 29 2019. Daylight photo


Added hair contours and texture accents
23:22 hrs May 27 2019. Daylight photo


Adding background for accent balancing
11:22 hrs May 26 2019


Adding texture detail 10:24 hrs May 26 2019
Daylight photograph


Accent and balancing by erasing 23:33 hrs May 24 2019
Photo shot in artificial light


Added texture detail 21:39 May 24 2019
Photo shot in the evening with artificial light


Corrected left eye and added some detail 12:02 May 24 2019


After another half hour 14:00 hrs May 22 3019


After airbrushing half an hour 14:00 hrs May 21 2019


July 7, 2016

Don Corleone airbrush / color pencil / Affinity Photo

A slightly different approach for this portrait. I used more color pencil, mainly to set up the image. Surface is a Canson oil / acrylic linen canvas structure paper, 33 x 41 cm which is difficult for airbrushing because of the texture and smoothness. It requires very intensive spraying to achieve colour intensity, but the result is very vivid eventhough I used few (dark) colors. I used Inspire H2O Black Smoke paint, Caran d'Ache Luminance 6901 (white) and Derwent Studio Sepia 53 pencils.

The setup technique is quite simple: I tape common office paper to the monitor and trace most important face features with a fine Edding 400 Permanent marker. The traced image I tape to my lightbox and placed the Canson paper on top of that. In doing so the pencil strokes on the Canson paper are limited and the pencils are used only to apply accents. It beats using a traditional projector, since there is always an unobstructed view on the reference trace image and the projector's heat dissipation always causes the image to move (become larger), which in portraiture is disastrous. Intense thin lines nevertheless had to be sprayed with the Iwata Custom SB airbrush, because of the irregular surface of the Canson paper that mimics a canvas structure.

The reference image contained mainly black hues, which made me decide to make a monochrome portrait. Later (October 2022) I added a colour layer in Affinity Photo and made some corrections - right side of the mouth' upper lip, left eye and overall hardened the crispness with the burn / dodge tool, mainly to the shadowing and accents. Affinity Photo is a photo editor like Photoshop, equally functional, but at a much lower one time fee. This program allows to apply corrections digitally, that would take ages to do with an analog airbrush, brush eraser, colour pencils, hairy brushes and Exacto surgical knife.

Editing analog airbrushes with Affinity Photo is what I often do lately. After not having looked at old airbrush portraits for a long time, I see all sorts of mistakes that are easily and quickly corrected in this photo editing program. Apart from amending shapes, it also allows to tinker with colour accents, which would be some sort of an ordeal with an analog airbrush and real paint.

The photos of the various stages were shot with an old Sony smartphone camera, which explains the mediocre quality of the images. Update sequence: Newest stage on top, oldest stage at the bottom. Click on the photos to see larger versions of the images.


May 29, 2016

Double child portrait

This portrait is sprayed on canvas. It is a surface for airbrushing very different from paper or board since the canvas' surface is littered with tiny cavities that require special attention to be filled with paint. The surface was grounded with Schmincke Aero Grund, a white primer to ensure good adhesion of the paint. Many layers of this primer were sprayed prior to airbrushing the portrait. Portraits on canvas take much more time than airbrushing on paper, but they have an atmosphere that is difficult if not impossible to copy on smooth surfaces.

The paint used is Inspire H2O, mixed with Createx 4012 reducer. The airbrush used, is an Iwata Custom SB, which is a versatile tool. When used in the 'normal' position it is a regular siphon feed gun, but when tilted slightly gravity steps in to make it behave like gravity feed airbrush. Unlike airbrushes that have the paint cup above the main tube, nothing blocks the artist's view, allowing unobstructed sight on the artwork. Its needle / nozzle combination produces very subtle thin lines to be sprayed, which is a great benefit for portrait artists.

Children's faces consist of very subtle lines and areas. It requires much attention and concentration to airbrush them correctly - especially on a canvas surface. I intentionally beautified the portrait, because the children were in the episode of losing their baby teeth. Since portraits are (sort of) permanent recordings, I prefer to 'skip' the dental process and airbrush them with more beautiful teeth...

The photographs were shot with a Sony Xperia Z5 Compact smartphone that produces much better photographs than the Samsung S4 Mini I used before. A really great improvement. The difference in hues is the result of the time of day at which the pictures were taken. I don't have proper artificial daylight lighting and prefer working during the day in natural sunlight.

So far (May 29 2016 13:00), it is a work in progress; the oldest stage at the bottom, the most recent at the top. Click the images to see larger versions in Blogger's Lightbox.


Virtual rendering in 3D frame to assess what portrait will look like


January 17, 2016

Putin airbrush test

Test freehand airbrush:

• Transfer method ( http://goo.gl/90FjbJ )
• Various reducers
• Highlighting white base paint vs erasing
• Type of paper

Transfer method worked well, but reference must be sharper, more detailed and saturated print for better results.
ComArt reducer did not work well at all with Inspire H2O paint. Vallejo reducer worked excellently. Inspire's own reducer worked best.
Erasing sharp edged white areas and highlights gave better looking result than spraying base white.
Schoellershammer paper blurred ultra-fine lines, while previously used Van Beek Retouch paper (200 grs) worked excellently. Paper size: A4.

Test required 27 drops of H2O paint = 162 drops of reducer.


Jan 17 2016 - virtually framed


Crop of completed airbrush test


The size of this test portrait is A4 (210 x 297 mm). It's not very difficult to airbrush lots of details in a huge painting, but it is a challenge to do the same in a small painting. I actually changed Putin's facial expression and made him look slightly more sarcastic. Compare the airbrush with the reference image you see below. The airbrush portrait could have been taken into more detail, but since this is a test, I stopped at the level that is visible above.


May 10, 2015

New kid on the block: waterborne Inspire H2O

When cleaning paint after the airbrush has (visibly) run out of paint, I always pour airbrush cleaner in the gun's paint cup, suck it up and blow it back several times with a pipette. It draws paint residue (paint particles and flakes) into the pipette that I blow from the pipette into the spray-out container so that paint particles and flakes will not clog the nozzle. I do this until no more particles and flakes are visible in the pipette. After that I blow cleaner through the airbrush and also draw back and lock the needle and put my finger on the tip of the nozzle to reverse the flow of the cleaner in the airbrush in order to release stuck paint residue from the airbrush. After that I blow cleaner and finally water through the airbrush.


Spray-out


When cleaning in such a way, it becomes obvious that most paints form particles and flakes that are left in the gun after the airbrush stopped spraying paint. Createx does it, Holbein Aeroflash, Illu-Color and Vallejo Premium all leave some type of residue inside the pipette and on the inner wall of the airbrush paint cup when cleaning according to the method explained above. However, this is not the case with the relatively new waterborne Inspire H2O. The pipette and paint cup remain almost entirely clean.... The first paint I used that has this excellent property.

I also noticed that while mixing the paint before spraying, for which I also use an other pipette to thoroughly mix the paint and reducer, Inspire H2O hardly left any residue in the pipette after the mixing was done. I think that is a sign that the pigmentation is very fine and the binder and solvent are doing a great job. Spraying with Inspire confirmed my suspicion; the paint performed miraculously well in my Iwata Micron SB. Below you see a test that gives an indication of how well this paint behaves.


The measuring scale is in centimeters


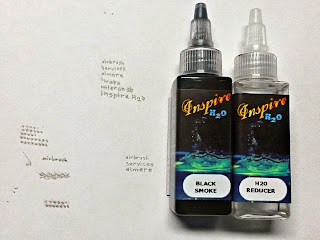
To spray the text shown above I used Inspire H2O in the following ratio: Paint : Reducer = 1 : 15 setting the air pressure just high enough to drive out the paint (somewhere around 7 psi or half a bar). But what is more amazing is that after leaving the airbrush untouched for 3 hours (with the paint still in the cup) it sprayed just as well as when I first sprayed it. And it gets better: same thing after 6 hours...., as if spraying with freshly mixed paint.


Inspire H2O 'Black Smoke' and Reducer I used for the test


Another positive property of the H2O paint is that it hardly leaves any tip dry. In this respect it is on par or better than solvent-based paints. And as you can see, the testing was done with black, which traditionally is a 'difficult' color (gross pigment, clogging and tip dry in most brands). Next week I am going to buy other colors of this type of paint and continue to experiment with it. No need to say I am quite impressed by this new paint for airbrush artists.