July 19, 2016

135 glasses

New possibilities with new software (Cinema 4D R17). When you think there's no more functionality to be invented, they come up with new things. The spline tool is amazing and parametric, even when objects are cloned multiple times, allowing users to fiddle with shapes. The edge smoothing - chamfer and fillet - was a long awaited feature that adds to realistic rendering. Great work Maxon!

Area light and infinite directional light were applied. Anisotropic rendering and depth of field as rendering functions. A floor was also used. The R17 rendering engine is great and includes a filter that allows to manipulate many settings. Slight editing afterwards was done in Corel PhotoPaint and Faststone image catalogue. Transparancies, reflections and shadows can be controlled excellently.


1920 x 1080 pixels


The advantages of 3D modeling are that view angles can be changed almost without limit, the scene can be modified - lighting, object shape, colouring, texture and positioning etc. A variety of lights can be placed anywhere without the source itself being visible or casting shadows. Each (part of an) object can be made transparent, have controlled reflection and the shadows cast are modifiable as well (sharp, blurred and defined between opaque and absent). And these are only a fraction of the possibilities...

Update
All in all this was a useful upgrade for the type of simple work I usually create. Meanwhile R18 Prime has been released for a relatively modest price - $ 945.45 - compared to other 3D programs. In addition (and for additional money) the Broadcast, Visualize and Studio versions are available, each of which adds functions to those already incorporated in Prime. Price schemes you find here.

July 15, 2016

Roger Waters portrait - frustration limiter

Recently my bloody computer crashed. Guess which system? I'm having an ordeal repairing the unruly beast (it's not a run of the shelf machine, but one tuned to DTP and 3D). While waiting for processes to finish I started doodling Roger Waters to limit the measure of frustration.

What I found out during this frustration limiting process, is that the surface of the dirt cheap office copying paper works quite well for both airbrushing and working with (opaque) colour pencils and that it allows to combine both techniques perfectly. However, the paper is very thin and in no way suited to any erasing that goes beyond using smooth and soft erasers (let alone scalpel or fiberglass erasing techniques). So this unplanned project has me searching for the proper type of paper - with a smooth, but not too smooth surface - and oil based colour pencils that would make the portraits water resistant and light-fast.

The tool I used for this rush portrait are: Iwata CM SB, Inspire H2O, Caran d'Ache Luminance colour pencils. I watched a number of Youtube videos and I concluded from that that Faber Castell Polychromos pencils may be what I am looking for. They are similar to Caran d'Ache Pablo oil based pencils, but significantly less expensive. I will try them in the near future and post my experiences with them in this blog.

Oldest stage at the bottom, newer one above that.


July 12, 2016

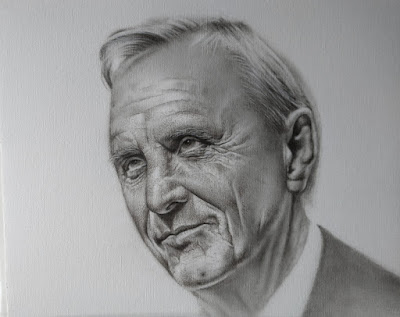
Johan Cruijff airbrush portrait

I started airbrushing this portrait in December 2015 before Cruijff passed away in March 2016. Then didn't touch it for months until July 12 2016. Airbrushing on linen textured paper is more difficult than on smooth paper. Textured paper is wrinkled - furrows and ripples - which causes the jet from the airbrush to miss the lower parts while depositing more paint on the higher parts. To avoid inconsistencies the airbrush has to be moved slow and mix ratios of reducer and paint require more attention, generally spraying with more diluted mixtures in more layers to obtain the required colour intensity. Difficult as it may be, the surface texture gives the airbrush a traditional atmosphere.

In last December I still favored the Iwata HP-BH to spray with. That changed when I focused more on using Inspire H2O paint, which is process perfectly in the Iwata Custom SB that has a slightly smaller nozzle and a sharper needle point. When airbrushing a lot of detail on difficult surfaces, such properties matter. The SB and the H2O are an ideal combination that make it possible to effectively airbrush on textured surfaces. Especially since the SB is a syphon type gun that has the paint cup on a side (the SB is interchangeable). It results in an unobstructed view to the paper, while this positioning of the cup shortens the distance between trigger and nozzle tip, which means the artist has a more accurate control over the placement of the spray. The H2O paint has wonderful characteristics; it barely clogs and flows excellently while drying quickly after hitting the paper. I used Black Smoke once more with allows to spray any grey hue necessary between white and (almost) black.

Oldest stages at the bottom, newest on top.


I'll stop here before I ruin it...
Virtually framed in 3D


July 7, 2016

Don Corleone airbrush / color pencil / Affinity Photo

A slightly different approach for this portrait. I used more color pencil, mainly to set up the image. Surface is a Canson oil / acrylic linen canvas structure paper, 33 x 41 cm which is difficult for airbrushing because of the texture and smoothness. It requires very intensive spraying to achieve colour intensity, but the result is very vivid eventhough I used few (dark) colors. I used Inspire H2O Black Smoke paint, Caran d'Ache Luminance 6901 (white) and Derwent Studio Sepia 53 pencils.

The setup technique is quite simple: I tape common office paper to the monitor and trace most important face features with a fine Edding 400 Permanent marker. The traced image I tape to my lightbox and placed the Canson paper on top of that. In doing so the pencil strokes on the Canson paper are limited and the pencils are used only to apply accents. It beats using a traditional projector, since there is always an unobstructed view on the reference trace image and the projector's heat dissipation always causes the image to move (become larger), which in portraiture is disastrous. Intense thin lines nevertheless had to be sprayed with the Iwata Custom SB airbrush, because of the irregular surface of the Canson paper that mimics a canvas structure.

The reference image contained mainly black hues, which made me decide to make a monochrome portrait. Later (October 2022) I added a colour layer in Affinity Photo and made some corrections - right side of the mouth' upper lip, left eye and overall hardened the crispness with the burn / dodge tool, mainly to the shadowing and accents. Affinity Photo is a photo editor like Photoshop, equally functional, but at a much lower one time fee. This program allows to apply corrections digitally, that would take ages to do with an analog airbrush, brush eraser, colour pencils, hairy brushes and Exacto surgical knife.

Editing analog airbrushes with Affinity Photo is what I often do lately. After not having looked at old airbrush portraits for a long time, I see all sorts of mistakes that are easily and quickly corrected in this photo editing program. Apart from amending shapes, it also allows to tinker with colour accents, which would be some sort of an ordeal with an analog airbrush and real paint.

The photos of the various stages were shot with an old Sony smartphone camera, which explains the mediocre quality of the images. Update sequence: Newest stage on top, oldest stage at the bottom. Click on the photos to see larger versions of the images.