Showing posts with label big cat. Show all posts

November 15, 2022

Continuing jaguar illustration in Affinity Designer 2


Crashes, crashes, crashes!
After having too many crashes and freezes in the high potential VectorStyler with the jaguar illustration I continued it in the newly released Affinity Designer 2 to test out this new release with more intensity. I crashed three times in Designer 2, but the first time I was offered to open a backup file that did not appear to have lost too many data. The second time no such option was presented. Restarting after the third crash, offered to load a recovery file, but a lot of work was lost. Upon re-opening the document crashed in the same way and it was not possible to save whatever was newly drawn.

Perhaps this is due to the fact that already in this relatively early stage - stage 1 - there are a ton of objects, to all of which several effects were applied. As mentioned in the previous blog entries, my computer is from before the Jurassic era, which may also be part of the crash problem. But probably there is also something not right with the software.

Whatever may be the case, here is the continuation of the art I started in VectorStyler. I exported the file as an .svg and opened it in Affinity Designer to take it from there. In the imported .svg, all shape blurring was removed, but some of the ripple distortion had remained in tact. I was relieved, because this meant that I only had to make a few minor adjustments.


First experience in making a complex vector drawing in Designer 2
Drawing in Affinity Designer 2 doesn't feel much different from the previous versions - I installed all the previous Beta versions - apart from the coloured icons in the toolbar, the rearranged functions in the fx dialog box and the changed layout of the Layers panel, as I've noticed so far. From the tools added to version 2, I only used the 4 point distortion, which at times needs a refresh by zooming in and out again and  and the shape builder tool to adjust a spot. A vector ripple distortion tool like in VectorStyler would have been useful to apply to the spots in the fur in this drawing; in Affinity Designer I had to apply the distortions manually with the pen and node tools. 

As usual the newest stage will be placed on top and the oldest one at the bottom. On a PC or Mac, click on an image and scroll through the images using the mouse wheel and quickly shift through the images to see the difference between the various stages. Additional comments below the image captions.


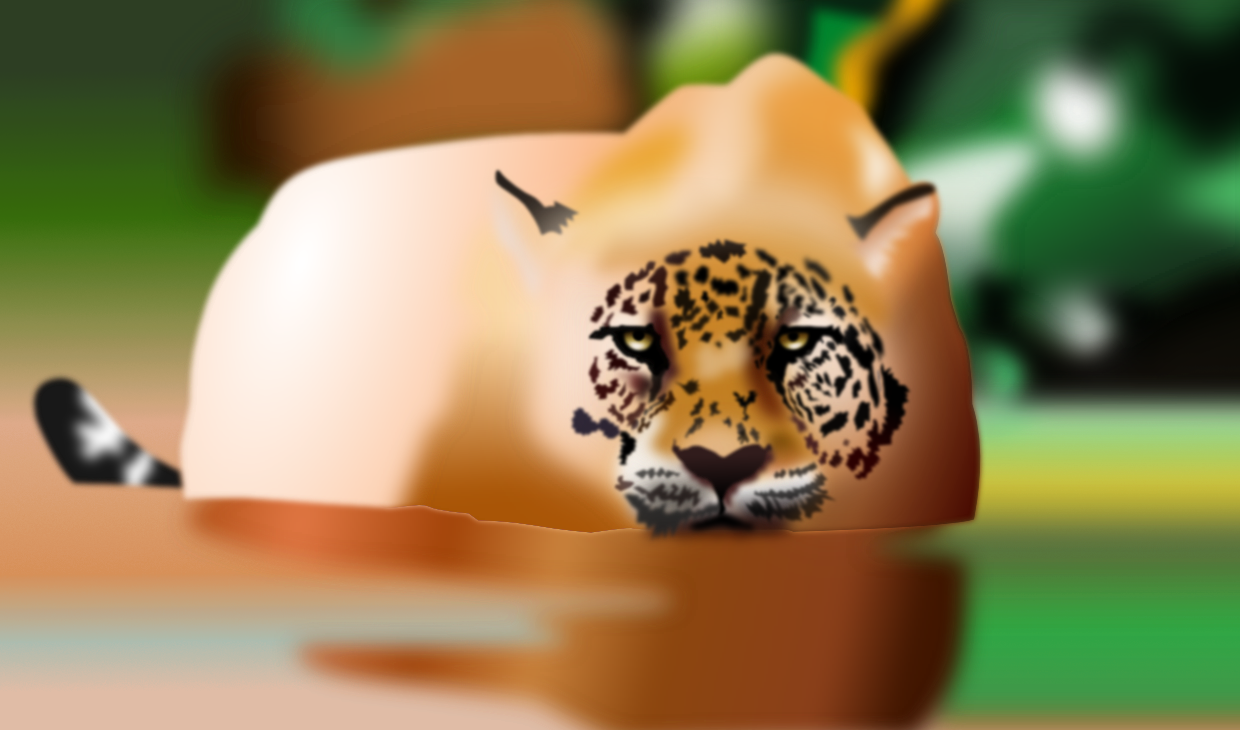
Stage 10 - added the texture base. Somehow the old
machine did not crash after drawing the previous stage.

The jag's tail was reworked, its left eye was made slightly bigger and the base for the fur texture was added (experimenting with this, because it must be vector only). No 'vector' brushes, no symbols and no patterns were used, because they are not real vectors, which are among the sadly still missing functions in Affinity Designer version 2. My outdated machine is barely able to keep up, but surprisingly did not crash during this stage. Exporting the file to .png however took an eternity. The original size of the drawing is: 3735 x 2270 pixel, because I have vague plans to have this drawing hi-res giclée printed on aluminium covered with a high quality lacker layer. The image placed on this site is smaller and therefore contains less detail than the original.


Stage 9 - tedious face fur detail drawing.
Crashed only once (....)

Although weary of crashes, began drawing the fur texture in the face of the jag, for which I used a number of tricks that I may explain in a separate blog entry somewhere in the future. No vector brushes were used whatsoever, because these are bitmaps drawn along a vector stroke, so no real vectors. The new X-ray view in Affinity Designer is quite useful to select objects in a drawing that contains many objects. This drawing is 100% vector. The old machine is behaving above expectation and I crashed only one time....


Started to draw the face fur texture detail - stage 9


This is the vector outline view of the image right above this one.


Did some work on the reflections on the water surface
in this 8th stage. No crashes fortunately this round.

I could not leave the project alone, so I cautiously proceeded., hoping the crashing would not occur. After having received a tip from Stuart RC on the affinity forum to use the pencil tool for certain aspects of the image, I was able to speed up the drawing process considerably. Never used the tool before, so I guess I underestimated its usefulness. Also did detail the jag's hair in the ear areas.


7th stage - an other crash in Designer 2. I was given an option
to open a recovery file, but much data was lost. To make things
worse, the crashing continued after opening the recovery files.

Yet an other crash in Affinity Designer 2 when editing the water surface of the river and foliage in the background. I have become careful and save the file after drawing every new object; still more data than that was lost. In spite of all these annoyances, I got the base of the water and background done. A bug I detected was that when area objects that were given a Gaussian blur overlap a weird line displays in the contour of the overlapped object.


Detailing of spots and whiskers - sixth stage

So far so good; no crashes in Affinity Designer 2 anymore. Made several minor changes to the various shapes, like changing the contours and colour adjustment. I also added the whiskers with adjusted stroke properties and mild Gaussian blur. Pussycat is starting to come alive on its way to kill.


Coming along nicely without crashing in fifth stage.

The biggest pain  - drawing all the spots without having a ripple distortion available - is now behind me. What is left is drawing of shadows' lighter areas and accents and tweaking them. Plus the reflections and colouring of the water ripples of course. In reality - to be safe - I have so far saved 17 files of this image, including those drawn in VectorStyler before switching to Affinity Designer. The Aomei on the fly backup system will hopefully prevent data loss.


Continuing to spotify and balance the colours in fourth stage.

The quality of portraits is defined by their appeal, which is determined by the intensity and tone of its accents. Subtle changes can impact the impression that an observer gets in a way that is disproportional to the extent of the change. They have to be balanced in combination with the tweaks of their environment. Trying to do this properly, so that the cat comes alive, so that its murderous mindset becomes tangible.


Affinity Designer version 2 crashed for the second time in
this third stage. Complexity apparently is difficult
to process for my struggling old machine

The abundance of spots have a shedload of nodes. I sometimes think that today we are still in the stone age of computing, in spite of what manufacturers want us to believe. At least that would probably be what people from a far away future think of man's current achievements in this field. I was not presented with the option to re-open a backup file this time, so I guess I have to see what happens from here on with working in this 100% vector image. Keeping my fingers crossed is the only option I have until my new, more powerful rig arrives.


Many more spots to go - stage 2
I think I didn't miss a spot yet ....

Imagine, in the jag's DNA code is included each and every coordinate of every single hair, its colour, length and type. It makes drawing a vector image of the big cat a walk in the park by comparison, however tedious drawing may be. For the final stages I will have to use my Huion tablet to draw the (dark, medium and light) hairs to make the jag's fur look more realistic.


First stage after the transfer from VectorStyler.
Strewing spots all over the hunting feline.

The jag's image, drawn in VectorStyler, still looks weird in this stage, similar to the early stages of almost anything else, which hints at the fact that from weirdness often coherent appearance comes. With so few objects or shapes drawn, it is hard to properly balance anything. So, I progress as fast as possible to leave this initial stage behind me.


January 21, 2021

View to a kill - Jaguar vs caiman vector drawing


Recently I discovered a stunning photograph shot by Justin Black, showing a view to a kill; a jaguar catching a caiman in the tropical rainforest of the Amazon. This predator hunt predator moment has a vigorous impact on those looking at the image (this would be a normal person's reaction anyway). Being a witness of a kill, has the tendency to cause neurons to fire a barrage of impulses, generating gamma brainwave patterns in response to perceiving the brutal event, especially when watching the motions in a video that accompanies the photo on the National Geographic website. Such things did occur within my upstairs department, after which I felt compelled to make a vector drawing of it. At the time of the most recent update - January 24 2021, it is still a work in progress, but at this stage it is already visible where it is going. As usual, I created this vector art in Affinity Designer, Serif's magnificent vector drawing program, that can be purchased for just 50 Euro, a one time fee without the rip off recurring subscription payments.

Like I usually do, I changed some features of the image, to enhance its optical affect. I altered some of the jag's facial traits (made its eyes look more leopard like) to make that part of the drawing easier on the eye and will arrange the background in such a way that it does not interfere with the battle of the beasts. Also I placed the jag's tail on the opposite side of its body relative to how it was in the photo to make the composition more balanced. I am still undecided about the cut out format; the photograph is taller, showing more of the scene, but I assume this matter will sort itself out in time or I could simply make more than one version of this work. For the moment I chose a panoramic lay-out, because I may use it as a header image in my website. There you find my portfolio that is distinguished from most vector art collections, by the way, in that I use vector drawing programs to create mainly organic shapes, for which these types of applications are unfit as most 'experts' would say. I am also considering to make both a graphic version and a more realistic version, if I ever get around to draw the latter, which remains uncertain even in times of lockdowns that cause people to become bored senseless.

Upto now, I've exclusively used the mouse to draw (it is a slow tool, but very accurate), but at a later stage I may use my Huion 610 Pro tablet to add the jag's fur texture and perhaps some of the caiman's scales to elevate the image quality and give it a near photo realistic appearance. Before reaching that phase, I focus on establishing the base, which already has some level of detail intricacy. A thing to take into account is that at stage 12 already over 500 layers (curves or objects) have been created, a number that will rapidly increase when using a tablet. It is necessary to give key layers a name and colour code them to keep control over where I am working in Affinity Designer's Layers Panel, and it requires alertness and a logical approach to properly navigate and draw in the complex object hierarchy. When the drawing will be completed, I will add the vector outline image, from which those familiar with vector drawing will be able to get an idea of the power of the Affinity Designer program.

Click the image to see all of them in Google's lightbox, a manually operable slide show. It allows you to swiftly flick through the various stages by turning the scroll wheel of the mouse. This lightbox allows to compare the stages visually like nothing else does and quickly see the changes applied. Unfortunately this function can only be accessed on PC's, Macs or laptops and not on tablets and smart phones (as far as I am aware). Newest stage is on top, oldest at the bottom. Please check in regularly as I continue to post new stages in this article, until the image is done. Text updates will be placed below Stage 1 at the end of this blog entry. Enjoy your visit to this page and feel free to do some more browsing in my blog and if you like it, spread the word and perhaps even blog about this blog. I will of course return the favour. Have a nice day. 


Update February 18 2021

Below you see the next version, edited in RawTherapee, an absolutely brilliant open source image editor, that gives Adobe Lightroom a run for its money. In fact, in many respects it is better than the industry standard, while offered for free. Besides offering outlandishly good and easy to operate editing and batch editing functionality, it allows to catalog images, which are the same functions Lightroom has. Artists chased away by Adobe's wretched subscription model, should definitely give this excellent program a try, most of whom certainly won't be sorry for giving it a test run.

I removed the foreground drawings (the snake and the monkey), because I felt it took the focus of the main part of the image, to which I did some more vector detail editing.

I saved the drawing with history, which should make turning it in to a tutorial in the future somewhat easier. But I still have to familiarise myself with video editing. Plus, as usual, the future remains at least as unpredictable as winning lottery numbers. Which particularly applies to the future in these sinister times. 


Stage 27 - edited with RawTherapee


Stage 21 - graphic version


Stage 15


Stage 14


Stage 13


Stage 12


Stage 11


Stage 10


Stage 9


Stage 8


Stage 7


Stage 6


Stage 5


Stage 4


Stage 3


Stage 2


Stage 1


Stage 16 vector outline


Update January 31 2021

After stage 21, I think I went a little bit overboard, which probably is something many designers recognize. To stop drawing at the right moment, remains a difficult decision (for me at least). Fortunately, Affinity Designer is a non-destructive program that allows to revert to previous stages without problem; layers can be switched on and off at will and the history function allows to remove any step necessary, apart from the 1000 standard undo's. I will therefore leave the design for the time being and later focus on enhancing the textures somewhere in the future. Meanwhile I will start drawing other things.