March 10, 2015

Airbrush innovations

Since Jens Paasche built the AB - better known as the Turbo - there haven't been an awful lot of innovations in the world of airbrush. Testor conceived the Aztek, which is basically an idea bordering on brilliant design, that was ruined by the use of inferior materials. It keeps production costs extremely low, which is always good for profit, as does the limited durability of the parts, both of which are the result of the poor materials of which the airbrush is constructed. One of Testor's officers told me during an airbrush fair of many years ago, that the Aztek was built from only 8 dollars of materials (....). Testor stopped the production of the Aztek recently (2022). But when the thing was relatively new and used with a properly diluted paint - rather thin than more viscous - it did not perform bad at all. In addition, the materials from which it was built, made it work with the more aggressive thinner and solvent based paint. So, unfortunately the commercial aspect prevailed over usability for creative artists.


Paasche Turbo


Testor Aztek


Fischer AeroStar


In complete opposition to Testor's approach French manufacturer Fischer invented the AeroStar, that featured an innovative design and functionality, while using exotic materials like titanium and magnesium. The combination of design and use of costly materials made this airbrush extremely expensive. It sentenced the fabulous tool to a lamentably short career, in spite of its absolutely unparalleled performance. Somewhere between these two extremes Iwata operates. It produces high quality airbrushes that are deliberately made incompatible with each other (it is not possible to exchange nozzles between Iwata's models, needles and other parts) and sells them for the highest prices in the airbrush market.


Iwata HP-BH


Harder & Steenbeck Infinity


Harder & Steenbeck Evolution, which parts are
interchangeable with the Infinity shown above


Yet an other policy is maintained by Harder & Steenbeck (recently bought by Iwata) that favors exchangeability of parts of its models, which resulted in gaining a considerable market share. But neither Iwata and Harder & Steenbeck have introduced any stunning real innovations, that probably is accepted by airbrush artists, because they simply don't know any better than what they are currently offered and familiar with. Up to now Iwata has not changed anything about the optimized usability and reasonable price of the Harder & Steenbeck airbrush guns.

I posted an innovative airbrush construction idea some time ago, that probably is too far out; the device would have an ultrasonic pump that would be capable of pushing out the smallest clusters of pigment, while agitating the paint (and therefore make the paint flow better). But besides such a revolutionary idea (for the airbrush trade anyway), there are enough improvements that are possible, but few of them are found in airbrush guns currently on offer.


Colani airbrush


One such improvement could be a pistol grip like in the Colani and similar brushes (Grex, Sparmax etc.), but with the possibility of double action operation. This could be done by using a split tall pistol type trigger of which the upper part (colored red) controls the amount of paint and the bottom part (colored blue) the amount of air given. An other improvement could be the attachment to the brush of a small paint container by a flexible hose. This would result in the benefit of gravity feed, without the nasty risk of involuntarily spilling paint on the artwork. The container could be clipped to the easel or even to the top pocket of the artist's shirt.


Airbrush gun concept


I may elaborate on construction details later (still brainstorming...). But the above image may already give a rough idea about what is taking place in my brain concerning a more ergonomic and effective type of airbrush gun. The hose at the top leads the paint from the container (not shown) to the brush, the hose at the rear end is for the air supply. Turning the brass wheel controls the air pressure, the wheel at the bottom adjusts the response sensitivity of the airbrush (by relocating lever hinge points). Spring tension can be adjusted at the back (above the air hose) as in traditional airbrushes.


February 16, 2015

The Telling of Legends

The inspiration came from a painting by Howard Terpning called 'The Telling of Legends'. I decided to make a different type of legend. Changed the expression on the old man's face and gave the young man a Winchester rifle. I might rename the painting to 'Peace pipes and Winchesters'. This is a work in progress (Feb 16 2015). If you click on one of the images and turn the scroll wheel of your mouse, you will see all images appear as in a slide show, allowing you to see the differences between the various stages more clearly. Oldest stage at the top, most recent at bottom.


February 13, 2015

Digital prep for analog painting

I think I am going to shift from airbrushing to painting (in oil) again and from realistic to a more impressionistic style - something somewhere in between the two. I have been fiddling around in order to paint a more vivid and extended palette in software which I find an excellent way to determine the final method of painting in real life with real paint.

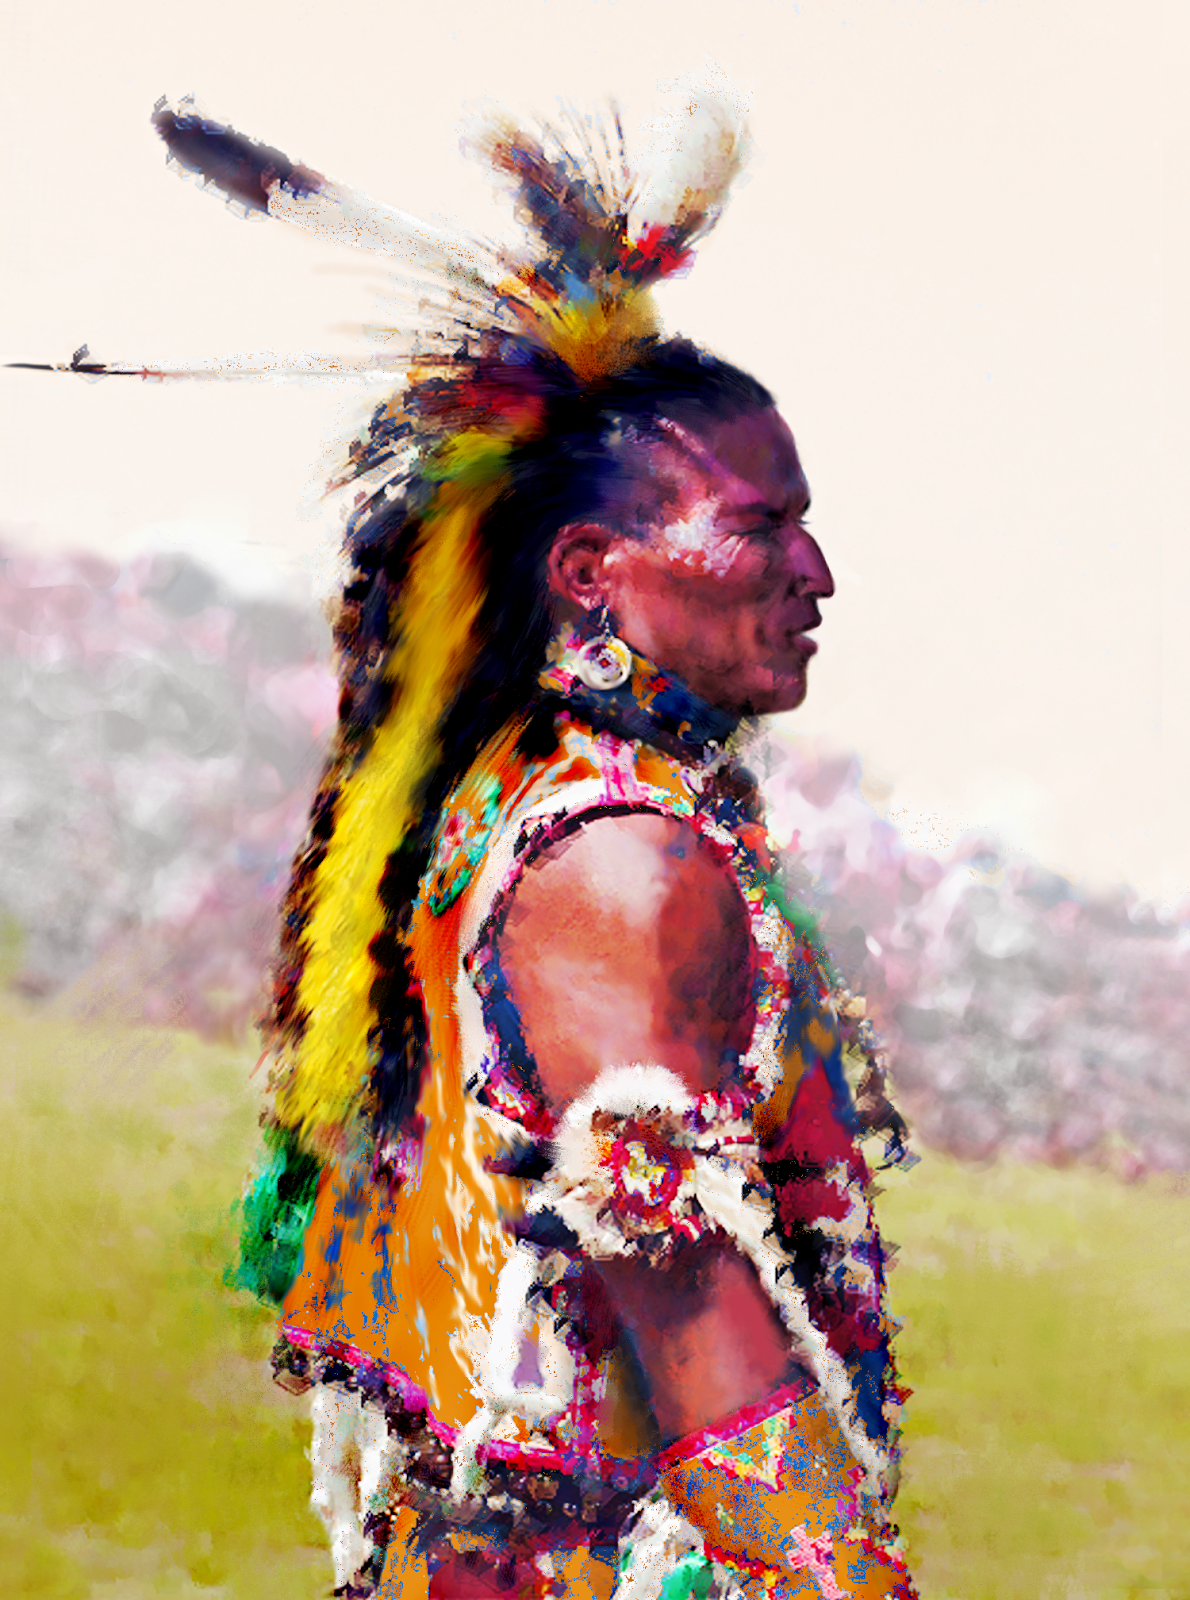
An example you see below. I found an image of a beautiful painting by Harley Brown, Called Bitterroot Chief. Though I loved the image composition and palette, I decided to change some facial features and expression. Below you see the original.


Original painting by Harley Brown


I changed the eyebrows - lowered them - and eyelids, as well as the shape of the eyes. Also slightly altered the nose and did some work on the mouth. Native Americans have a number of specific facial features that must be reflected in paintings to keep them 'authentic'. I think I am almost done tinkering in the digital realm and may soon pick up the brush and paints to make a portrait on canvas.


(almost) final digital rendering
before analog (oil) painting


February 4, 2015

Native American reference image material

From image to painting is often a strange path. After having had enough of committing art as a type of crime - in the sense that a lack of certain skills is ignored applying what has actually been mastered to create some kind of form that the artist prefers to see as art, while the rest of the world may find that a dubious opinion. It means that a different route has to be taken to arrive at the final work. That is, if it is acknowledged that this is a necessity, required to be taken seriously as an artist. Art of course is a subjective matter, but I found it was time for a change. Not to radical perhaps, but as an addition to acquired skills. Here you have the result.


Reference image

I try to look for material that isn't used by many other artists, resulting in artwork that is common. Finding good Native American reference images is rather difficult. Most photographic material is shot by non-professionals often resulting in imagery that lacks good reference material quality. But sometimes I run into images that have potential in spite of unfortunate properties. The above image is such a photograph. I leave criticism to the discretion of the reader.


Altered reference image


Being conditioned as hell, I changed the subject's nasal features and cropped the image, since the background is not what I would want to have in a painting. There are a number of other properties that I didn't like, but fortunately artists can leave them out or alter them as they see fit. Lately I have been enthralled by the painting style of Howard Terpning and was blown away by the possibilities of digital painting in general and the use of the Huion H610 Pro Graphic tablet in particular. I may try painting in oil at some point in the future, but currently that is a budgetary impossibility.


First digital doodles


Corel PhotoPaint in combination with the Huion make it easy to change features I did not particularly appreciate in the photograph. I started in portrait orientation, but later tried landscape which is more common in painting and digital representation. I do not like the background and will probably change that in a later stage. Depending on the proper background I may find, it is possible that I will return to portrait orientation. This quality of digital art creation allows to try different things while creating.


Landscape trial


I removed the tattoos on the upper arm, since I doubt if that was part of the original tradition. Changed some colors and changed the hair line. Stay tuned to see the various stages and end result.


Update Feb 4 2015
Changed eye and brow, made nose longer, upper lip thicker and chin less pronounced. Did some detailing on the dress and arm. I think I will make the portrait portrait oriented. Plains backgrounds in landscape orientation that fit flawlessly in the painting are difficult to find.


Update Feb 5 2015
Changed mouth and brow yet again. Altered nose curve slightly. Worked on texture of clothing (shadows). Thinking of removing entire background and replacing it by image that has hazed sepia tones. Still looking for images on the web.


Hint: Click on the image and a lightbox will open with all images of this page placed in chronological sequence. If you turn the scroll wheel of the mouse you will quickly flick from one image to the next or previous (depending on the direction in which the scroll wheel is turned). It allows to instantly see the differences between the stages.


January 16, 2015

Huion H610 Pro Drawing Tablet

My wife and daughters gave me a Huion H610 Pro drawing tablet for my birthday, which opened up new worlds for me. Ridiculously high priced Wacom tablets are way above a common person's budget, but the Huion is an affordable, stunning device that has a large drawing area (10" x 6.25") and great functionality. Here you find an excellent and extensive review that clearly explains the Huion's capabilities - it made me opt for the Huion. I use the Huion in combination with Corel PhotoPaint, which might not be the ideal combination, but for the time being it works perfectly for me.


I run Corel X6 on Windows 8.1 on a 16GB RAM quadcore machine with an Nvidia GeForce 750Ti graphic card. Figuring out the best driver for the tablet was a trail and error process and I had the best results using version 7; higher versions didn't quite work well for me. In particular I had problems with the dual monitor configuration - my mouse pointer was confined to only one screen. Corel PhotoPaint automatically configures the pen - Quick Doodler lets you use the excellent pressure sensitivity of the Huion pen, 2048 levels, resulting in a 4000 lines per inch resolution. I have the cabled version, which works fine for me.

The advantage of digital painting over analog painting or airbrushing is that you have undo-functions and can work in layers. Changes to hue, contrast, lighting and transparency or effect filter can be made afterward (per layer). The Huion tablet gives the digital artist a feeling very close to analog painting and in addition provides a few extra possibilities.

I started testing the tablet and here are some of the first results:


Very first test after I figured out what driver works best


Attempt to make a cartoon portrait of Lionel Messi


Below you see 5 stages of a digital double portrait painted from an original oil painting of Howard Terpning called "Proud Men". I used PhotoPaint's standard pen and Quick Doodle to set up the painting and then used the Smear-tool to blend and shape some of the strokes. Finally I used a small sized (small dib) with high transparency and the Sponge pattern to add fine detail, starting in Subtract mode and finishing off in Add mode.

As a final technique I used one that master painters from centuries ago already used: Glacis. This is applying highly transparent layers over one an other to give the image depth and saturated hues. It's comparable to spraying one or more clear lack layers over a custom painted object which immediately makes the image come alive. This technique also works in digital imaging. I duplicated the png image twice, gave the second layer a highly transparent Subtract filter and on top of that a highly transparent Add filter. Fiddled with the layers' transparency amount to prevent loss of detail.


Digital interpretation of Howard Terpning's 'Proud men'