Showing posts with label realistic vector painting. Show all posts

February 21, 2022

Tibetan Falconer vector painting various stages


In the previous blog entry I explained how I made the preliminary study. You may want to peek at this composition for comparison from time to time. In this blog entry I will place the various stages in which I manually draw the entire image in vectors exclusively. My working method is to initially draw parts with a moderate amount of details and later add detail to create a more realistic scene. I will post each stage with the date included. This vector drawing was created in Affinity Designer, but other vector drawing programs may have similar functions. The first image on this page will always be the most recent stage. Note: If you want to see larger versions of the images below, click on them to see those in Google's Lightbox. Press the Escape button on the keyboard to return to the tutorial.


Most recent stage


Since drawing this vector painting is going to be a rather lengthy and complex process (i.e. containing hundreds of objects, perhaps thousands when finished), I will make separate drawings of the various details and embed them in the main file, as I mentioned in the previous blog entry. This approach also keeps the number of objects per sub-object smaller, which allows the artist to maintain oversight and save time.

Stage 01 - The falconer's head (Feb 21 2022)

Below the rendered view of the falconer's head and the vector outline view at this stage. Note how few strokes and curves are used to achieve a relatively realistic appearance. This type of approach in Affinity Designer allows to edit parts quite easily in a brief period of time. The low number of curves and strokes are easy to find in the layers panel and editing each of them requires far less tinkering than the overrated mesh-fill techniques, in which each node represents a cluster of pixels that each have to be edited separately. This feature is in high demand on the Serif forums, but personally I don't miss it at all, because I can do exactly what is necessary to create a realistic image with less effort in less time.


Stage 01 - Rendered view


Stage 01 - Vector outline view


Stage 01 - Overview - where this head is in the overall composition


This KISS-type method of drawing does not only make images easily editable at a later point in time, but also keeps the file-size small, which allows artists to work faster, especially those with a not so powerful computer. The trick with the strokes is, that I manipulated the stroke width (in the Stroke panel) and gradient colour and transparency, while applying the Gaussian blur function to them most of the time, which results in a limited number of objects that make a realistic image nevertheless. Besides strokes a few curves were drawn in places where strokes won't do the job, using the same effects. Curves make it possible to clip other objects into them, which makes it possible to draw more complex shapes that have complex fills. Compared to the number of nodes that mesh-fill operations require, Affinity Designer offers a much more efficient editing method.

When drawing the stages I often deflect from the reference image to enhance the visual impact of images. In this case I made the falconer look straight at the observer and I changed some of his facial features to further enhance the appearance of the drawing.


Stage 02 - The hat (Feb 21 2022)

In this second stage I added the falconer's hat. Again, this is the base; detailing if necessary will be done in a later stage, which probably will involve using the Huion drawing table for the fur texture in the hat. The time I have available to work on this project varies considerably and is quite unpredictable. So check out this page regularly. Below you see the rendered view and the vector outline view.


Stage 02 - Rendered view


Stage 02 - Vector outline view


Although the textures in this drawing are complex, I try to avoid using vector brushes, because they are not really vectors, but actually strokes based on bitmaps, which will affect the quality of the image when re-scaling it to a size larger than the original drawing. This means a part of the texturing has to be hand drawn, but when objects are clipped and grouped in smartly, their properties can be changed instantly in many different ways.


Stage 03 - Base of the coat (Feb 28 2022)

In this stage I began drawing the basic elements of the coat. These basics are important and must be close to the final rendering or at least require minimal tweaking to achieve it. If they are not many changes are required to be applied at a later point in time. While drawing new elements of a drawing some measure of tweaking to already drawn elements are also done in order to maintain the balance in the overall appearance. Below you see a rendering of stage 03.


Stage 03 - Rendered view


The gold coloured ornaments on the collars were had drawn and reshaped using both the Move Tool (used for re-sizing and skewing) and the Node Tool to move nodes to the proper place and adjust their fluency. It would have been handy if Affinity Designer had a Distort Tool, which is one of the view functions I miss in the program, but manipulating these things manually is not too time consuming. Below you see the Vector outline view of this stage.


Stage 03 - Vector outline view


The repetitive smaller ornaments are a multitude of two slashes and an equal sign placed as text along a stroke, to which I applied Gaussian blur, 3D effect and a gradient transparency. I may edit this text at a later point in time to something that makes it difficult to edit when not in possession of the original vector file. So far I estimate I spent about 4 hours on this drawing.


Stage 04 - The falcon / Hawk

In this stage the various sub stages of the drawing of the falcon / hawk are shown. This required some tweaking since the parts were taken from several different photos and combined into one composition. Below you see the first sub stage, which is the drawing of the contour of the bird. Into this numerous objects will be clipped and edited.


1st level of Stage 04 - drawing of the bird's contour


Clipping hierarchy, used to add detail

The foundation of adding complex detail, always is to first draw the contours of an object, whether it is the complete bird, a shadow area or a single feather. Inside this contour - that can have a Gaussian blur, a fill, a gradient fill or a gradient transparency, other objects are clipped that represent the detail, highlighted or shadowed areas. Clipping can be done on multiple levels, for example: a shadowed area may have dark or light accents inside of it; these are clipped inside the already clipped curve inside the contour. Always bear in mind when clipping objects, that the Gaussian blur level of the curves higher in the hierarchy will automatically be applied to the clipped curves or strokes as well. This means that clipped objects will always have the blur level of the curve it is clipped inside or higher - never a lower blur level. If sharper edges are needed, they have to be placed on top of the clipping curve.


2nd level of Stage 04 - first details of bird


December 10, 2019

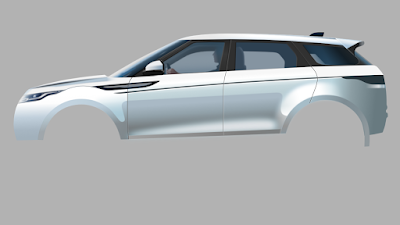
Range Rover Evoque - vector drawing


I was blown away when first seeing the Range Rover Evoque. Its design is stunning. Perfect in every detail. The designer obviously is brilliant and the fact that the car turned out so beautiful is probably the result of the marketing department not getting in the way. These blokes often are responsible for ruining designs that are a caress to the eye, because they want to please as many (potential clients) as possible. But with a designer capable of creating such a mind-blowing car, Land Rover did well to keep its marketeers on a short leash.


Stage 20 - Dec 11 2019 - 22:11 CET
with transparent background


The drawing in wire-frame view looks quite simple; the bulk of the work is to get the gradient colours right and the gradient transparency. They could of course be eye-dropped from the reference photo, but like in my portraits of humans, I like to put more drama in the images I create by altering details in which colours are very important. Another 'problem' in Affinity Designer is to get gradient shadows and reflections right, i.e. when gradients extend in more than one direction. I usually duplicate such an object and change the colours and gradient direction of the duplicated layer (and / or consecutive layers). The unwanted parts I 'remove' by applying custom transparency or by altering the shape of the object (adding or subtracting parts of the object area). B.t.w. all objects are given a Gaussian blur to make the image more realistic. Objects drawn in CorelDRAW or Illustrator often look unrealistic, because of (the object's) hard edges. Artists won't have this problem in affinity Designer.

Drawing such a subject results in many layers. Each object is a separate layer that I gave a specific name in order to make finding a particular object in the layers panel less of a hassle. I lock the reference image on top of all layers and make it transparent, so that I can always choose to see the reference or not while not interfering with other layers. Mind you, you can make the semi transparent reference layer visible, while still being able to draw on a selected layer below it, which is brilliant. I also use the outline view a lot which I gave a custom shortcut to make it possible to quickly switch between normal view and outline view. When having created a bundle of objects it is often quite useful to select the object in outline view (wire-frame view).

A feature not yet included in Affinity Designer is the feather function which would have been quite helpful (and time saving) in creating this image. But I saw Serif put it on the road map of future functions to be added. Although I'm not overly enthusiastic about mesh-fill function (like in CorelDRAW and Illustrator), it may have been useful at some points during the drawing of this car, but again, I saw this on Designer's road map of future functions. Other than that, Affinity Designer allows me to do things very quickly and precisely that I was not able to do equally fast or precise in the programs of the aforementioned competition, which becomes clear in particular in the vector portraits that you find elsewhere on this blog.

I just had to make a drawing of this eye caressing creation. It is a 100% vector drawing made in Affinity Designer. I bundled the first 12 stages in one image to get past the boring level and placed some later stages above that. Click on one of the images to see the stages in Google's Lightbox in which you can scroll through the stages swiftly by turning the scroll wheel of the mouse (on a PC anyway). Oldest stage at the bottom, newer ones above that. I've also made a short clip of this sequence that you find here.


Stage 20 - Dec 11 2019 - 22:11 CET


Stage 19 - Dec 11 2019 - 14:23 CET


Stage 18 - Dec 10 2019 - 19:06 CET


Outline view of stage 18


Stage 16 Dec 9 2019


First 12 stages


Here is an experiment with the video editor 'Olive', my very first try, so bear with me. You may want to take a peek at this video in full screen mode.


July 23, 2019

My Digital Art portfolio

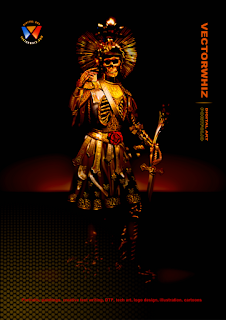
Not too long ago I was forced to take a break, but lately I cautiously started to get some things done again. Currently I am busy creating a portfolio of my Digital Art that will contain portraits, paintings, creative writing, DTP, tech art, logo design, illustration and cartoons. As some of you may have figured out as a result of my more recent posts, I have been putting an increasing emphasis on vector art for a while, but haven't yet abandoned pixel art all together. Affinity Designer makes it possible to even make realistic portraits and paintings in vectors that are indistinguishable from pixel art, except when this type of art is re-scaled; vector images retain their quality and crispness regardless of how much they're enlarged or sized down as opposed to pixel art that is created for one specific resolution.


But I digress. So far I've finished the cover of my Digital Art portfolio and a good number of pages that contain examples of my work, but the booklet needs to be completed still. At this point I am selecting a number of my poems to be contained within the document - I've written so many.... In addition I remake them in vectors to maintain the crispness of the fonts; so this may take some time. I plan to issue versions for print and for the web (in pdf) and will make them available in this blog and on the blog page on my website. Bear with me while I work on completing these documents and stay tuned. Above you see a 3D rendering of the booklet and below the cover image that was drawn in 100% vectors in Affinity Designer. The booklet is created in Affinity Publisher, Serif's newly released DTP-program.


I have vectorized the poems after which there are no more jagged edges (unless you zoom in like crazy). The portfolio is still not completed, but you can see the stage so far (August 1 2019) here. Bear with me; this document may still need editing. This will be completed in the final version that is still to be issued.


May 26, 2018

Vector painting - 'Crossing Death's Frontier'

This work probably is completed now (June 10 2018). A first attempt at making a realistic 100% vector portrait created in Affinity Designer. To be brutally honest I hate the proverbial vector portraits drawing method (no offence) that are full of hard lines that artists often try to hide by fiddling with the colours of semi natural shapes, because most vector drawing programs are simply unable to produce proper blurred edges. This shortcoming has been promoted to be some type of trend (which is what dodgy marketing departments do and gullible artists mindlessly believe), but it remains an absence of functionality nevertheless. Affinity Designer does not lack this crucial function. I admit that similar effects can in theory be created (in Illustrator and CorelDRAW) using the mesh-fill tool, but that requires a whole lot more time and skill and leaves significantly less room to improvise (which is what I did a lot in this particular painting).

Affinity Designer's parametric characteristics allow to change almost everything at any point in the designing process. This is impossible to do on-the-fly while using the mesh-fill tool in Illustrator and CorelDRAW. I'm aware of the mesh-fill technique b.t.w. because I tried doing that in the past. It requires a heap more time to create, painkillers to combat headaches and does not allow much tinkering once a drawing has been created, where as Affinity Designer offers almost unlimited possibilities in this field that don't require a great deal of time to accomplish. The magnificent open source program Inkscape has similar features, but its user interface is rather difficult to see through, particularly for those used to the Corel and Adobe UI's. Affinity Designer has a similar look and feel as those and shares many (programmable) shortcuts.

I'm currently trying to prove that by creating this vector painting and the vector portraits I've previously created, it is possible to create art that is indistinguishable from pixel art - the advantage being that vector art is resolution independent; it can be scaled to any size without losing quality. The results may not be perfect yet, but I feel I'm getting there. The outer edges of the shapes were blurred intentionally to give the painting a realistic appearance. Several sub-drawings were created to create ornaments mostly that were later placed (and edited) in the main drawing. Below you see the progress sequence. I will be posting updates in the time to come. This is a meticulous and labour intense process, so it may require some time. Affinity Designer's almost 100% parametric functionality allows endless tinkering to correct mistakes and / or apply enhancing effects. Click on an image to see larger versions in Google's light box that also allows to scroll through all images.


This is what it would look like when framed
Current hight over 1 meter, but infinitely scalable


HDR effect added


Completed (for the time being) vector painting
stage 20 of June 10 2018 12:08


Detailed view of vector painting
stage of June 10 2018 09:33


Postscript
The measurements of the original drawing are 156 x 126 cm, but the image can be resized infinitely to be smaller or bigger without losing quality (which is a characteristic of vector drawings). Creating this vector painting approximately cost me 2 months, working on it on and off. I am considering to make it available for print. This can be done on paper, (behind) plexiglas or on (dibond) aluminium by a print shop of which I am certain they can produce optimal quality. Contact me if you are interested.