
In this blog entry I briefly explain how I made my personal crest of which below you see the image. The main challenge was to find a way how to draw the snake's scale texture inside its winding body that also is narrower towards its tail section. After some trial and error I figured out a way to do it.
 |
| The completed rendered drawing |
First I did some testing in a separate drawing in order to be able to create the scales texture I had in my mind. To make the scales I drew and duplicated diamond shapes, with the result you see below. It is an early version, because the one I actually used, is too long for this blog, but this one gives a good idea of how I drew them.
 |
| The first attempt to draw the base of a vector brush in Affinity Designer |
After drawing these, I inverted the image and mesh warped it in Affinity Photo as is visible in the image below to kind of approach the texture width inside the winding and tapered body of the snake. It is possible to leave the diamonds unmeshed in a rectangular shape, but playing with the Stroke width only in Designer, to spread the scales properly over the body, leads to distortion of the texture. Hence this preliminary approximation. The inversion was done, because png's that are used for custom brushes must have a black background to make sure the brush has a transparent background once imported in Designer.
 |
| The brush visible above mesh warped and inverted in Affinity Photo |
I created a png of the above and imported it in Affinity Designer as a New Texture Intensity Brush in Designer. In the Brush dialog I set the Size Variance to high in order to be able to tweak the brush's width to the desired value. If the Size Variance is left at default zero, it is impossible to tweak the width of the brush afterwards in the Stoke panel.
Then I did some testing in yet an other separate drawing that you see below. Tinkering with the stroke width in Affinity Designer and manipulating the node handles of the vector brush allows to get rid of unwanted interference of the scales. I then found out that I had to draw different brushes (particularly longer ones since the snake's body is of considerable length) in Designer that were edited in the same way as described above in Affinity Photo, to be able to make a more realistic scale texture. For such purposes trial and error to get things right is difficult to avoid. By the way, vector brushes can be given any (gradient) colour in Designer as demonstrated in the image below.
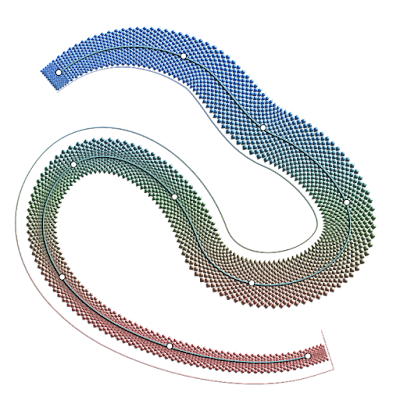 |
| Testing of the (not clipped) vector brush in Affinity Designer |
I drew the base for the texture with Designer's Pen tool, so that it could be edited accurately with the Node tool. Then I applied the Vector Brush to the stroke drawn with the Pen by double clicking on the Brush type, while the stroke is selected. Inside Designer I then clipped the vector brush inside the snake outline curve as is seen in the image below. I tweaked the brush widths in Designer's Stroke panel along the vector brush line to the proper values. Also, in the Effects panel I applied a colour overlay to tune the texture to the correct intensity.
 |
| The clipping of the custom made vector brush in Affinity Designer |
Below is the deceptively simple screendump of the vector outline of this image. The essence of this drawing is within the effects applied (the feature rich Layer Adjustment & Layer Effect tools, Gradient fill tool for shapes and strokes, Gradient opacity tool) to the vector curves at which Affinity Designer excels. Attempting to match the vision in the mind's eye is a challenge, but the Affinity programs allow artists to come a long way.
 |
| Vector outline of the drawing |
Finally in the Tone Mapping Persona of Affinity Photo, I enhanced the texture of the vector drawing, with the result that is visible in the image at the top of this blog entry. The Tone Mapping (to my surprise) resulted in a kind of patina effect to the shield, which I think is quite nice. It probably is the result of the multi node gradient colour function applied to the shield in combination with the Tone Mapping settings.
Note: The version of the brush I used in the end, is quite large (4208 x 164 pixels) in order to be able to properly render this image also in large sizes without getting a jagged and blurred appearance, because the drawing contains pixel elements in its complex non-linear textures.
My Chinese Zodiac sign is a Water Snake, which is the main feature of this personal crest. The meaning of the arched Latin text is 'Serpent Power' or 'Serpent Kingdom'. The X is a symbol of the Sun God who sustains life, secrecy or protection of (mystical) knowledge. The circle represents magical protection and sacred space. The mistletoes refer to protection against poisons and to mystical powers. 11 and 22 are master numbers pertaining to my birth date and name, according to the art of numerology. The infinity symbol at the bottom hints at my spiritual origin. Only after having reached the age of an elder was I considered to have grown sufficiently to understand that a symbol is worth a 1000 pictures.Hope this concise tutorial helps to create similar textures.