Showing posts with label Iwata HP-BH. Show all posts

October 17, 2022

Einstein analog / digital portrait


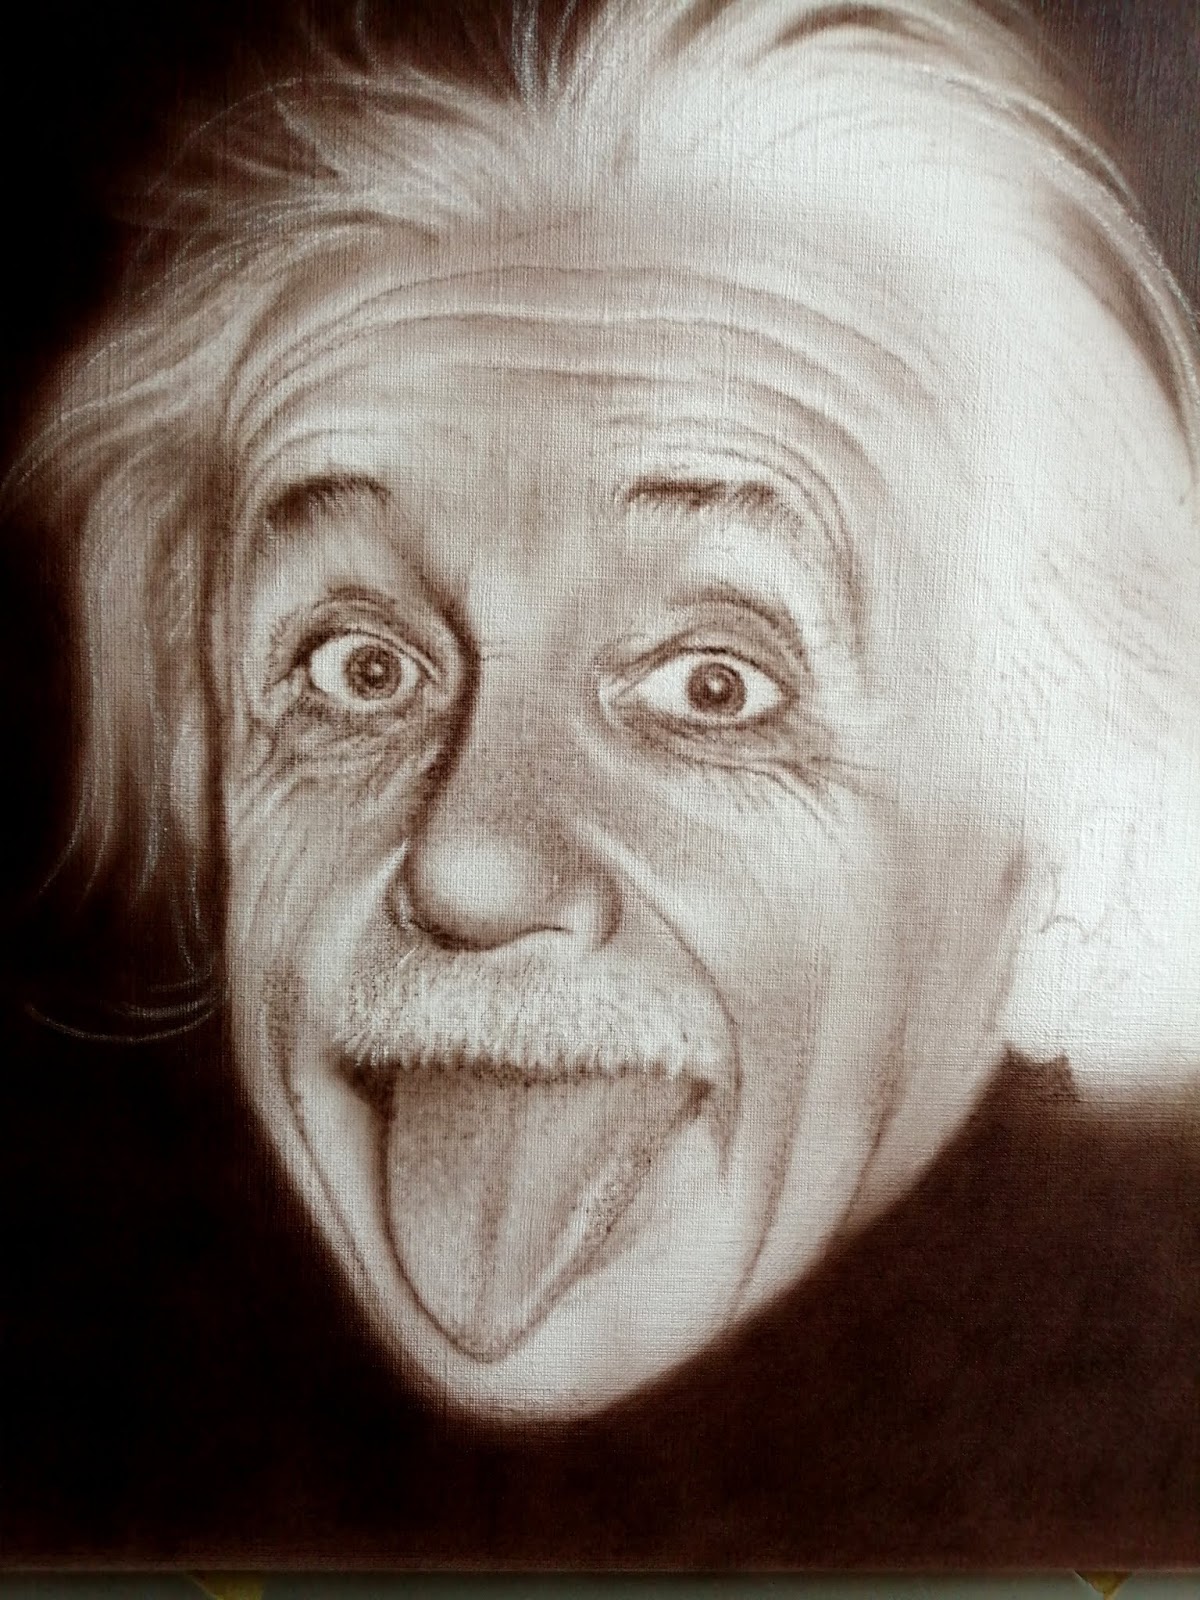
This is a proverbial combined freehand airbrush / Affinity Photo portrait of One Stone a.k.a. as Einstein, the relativity bloke. The man that urged Roosevelt to develop nuclear arms, that the US used to bomb Japan (twice) when the outcome of WW-II was already decided. In a long lost past I used to take up the airbrush gun and spray paint on different kinds of surfaces. With one or two exceptions always worked freehand, i.e. without any masking. 

Today, I work in the digital realm mostly, because it is convenient, less of a hassle and - most importantly - corrections are relatively easy to make in less time than is the case with an analog airbrush. I do sometimes however pick up the trusted Iwata or Harder & Steenbeck airbrushes to get my mind off things I need the time to process in a proper way; the old way of airbrushing works better to do such a thing than the digital stuff.

I used the Iwata HP-BH airbrush to spray the Inspire H2O paint on an old piece of paper that I had laying around. Very low air pressure, thinly diluted paint and Chillhop music to drift away, but not too far to be unable to do anything useful. To be honest, I like the HP-BH more than the Custom Micron, probably because I like different things better than what commonly is considered to be the best of the best. I was forced to buy the HP-BH on an airbrush show, after one of the visitors had stolen my Paasche V1 - which was the best tool ever - when I took a break and left the V1 unattended on the easel.

I dropped the HP-BH on the floor and because I never use the back cover of airbrushes, the needle was driven into the nozzle quite hard. I had to get it out using a pliers, because it was firmly stuck. However, the HP-BH kept on spraying like it never happened and I used the same needle and nozzle for years after the incident without any problem. I would not recommend hammering the needle into the nozzle before use, but I became convinced of the high quality of Iwata airbrushes.

Being a senior geezer, when finding an old airbrush painting, I see mistakes I made and correct them in Affinity Photo - a digital photo editing program, that resembles Photoshop, but is much much cheaper and equally as good or better. Check out my pixel paintings and vector portraits in my VectorWhiz website that you find here. Most recent stage at the top, older ones in chronological order, below it.


Digitally edited in Affinity Photo


On my DIY vertical light table


Analog airbrushed with Iwata HP-BH


Analog airbrushed with Iwata HP-BH


Early stage


May 22, 2019

Airbrushing that relativity bloke

I hadn't touched an airbrush for over two years, but picked up the tool again yesterday after a visit to Airbrush Services Almere that has redecorated their shop excellently. Not sure if I'll continue this old trade again, but it was nice to do. Therapeutic more or less. I used the Iwata HP-BH airbrush with Inspire H2O sepia paint on a canvas structured paper (Canson for oil- and acrylic paints). 100% freehand airbrush and some erasing with Faber Castell 7057 eraser pencil. No pencil- or hairy brush strokes added to enhance accents or add detail. I may be testing other airbrushes and paints while at the analog airbrush craft again.

The Canson paper is extremely strong and allows erasing (even with fiber glass erasers if done carefully) after which airbrushing over the erased area can be continued without a problem. In some places I sprayed Inspire white over the erased area before continuing airbrushing. That is somewhat similar to applying a layer of gesso onto which the portrait is sprayed. No spiders or absorption blobs due to too much paint accumulating in the damaged area where the paper surface was erased (which results in unwanted dark spots). Excellent!

This paper is well suited for artists who want their painting to have an authentic canvas effect, but in fact works a lot easier than real canvas.... It does not allow as meticulous details as on smooth paper, but real canvas doesn't allow too much detail either.

The H2O paint was I recalled it to be; the best a available on the market. Using reducer works better than mixing the paint with water. It makes the paint flow well, gives less clutter and keeps it usable / sprayable in the airbrush paint cup longer. In addition it allows erasing with more control. Finally it makes the airbrush easier to clean. These are properties not all paints combine.

For fine details I added Vallejo Flow Improver to the mix: paint : reducer : flow improver = 2 : 8 : 1 The Flow Improver really does its job well; add too much and the paint will slip (and cause 'spiders'), but it significantly extends the period in which very fine details can be sprayed or postpones clogging of paint in the airbrush. Nice stuff. Mind you, fine details are better applied on smooth paper or special airbrush board. Use low air pressure, push the trigger carefully to barely let paint come out and work very close to the surface (1 to 2 mm) with the air cap removed.

Oldest stage at the bottom, newest at the top. Hint: click on an image and you'll be taken to Google's Lightbox which is a type of slide show that allows you to scroll tbrough the stages (on a PC that is) for easy compare of the stages.


Really finished. 19:44 hrs June 11 2019
Only varnishing still needs to be done.


Finished. I think. 11:16 hrs
June 2 2019. Daylight photo


Further hair detailing 10:45 hrs
May 29 2019. Daylight photo


Added hair contours and texture accents
23:22 hrs May 27 2019. Daylight photo


Adding background for accent balancing
11:22 hrs May 26 2019


Adding texture detail 10:24 hrs May 26 2019
Daylight photograph


Accent and balancing by erasing 23:33 hrs May 24 2019
Photo shot in artificial light


Added texture detail 21:39 May 24 2019
Photo shot in the evening with artificial light


Corrected left eye and added some detail 12:02 May 24 2019


After another half hour 14:00 hrs May 22 3019


After airbrushing half an hour 14:00 hrs May 21 2019


August 11, 2016

Portrait of a little girl

Recently I started experimenting with a combination of airbrush and color pencils. I prefer the oil-based pencils because they're not affected by paints and lacquer. In addition their coverage is quite good and they leave light-fast colors. The Surface of this particular portrait was Canson's linen textured paper, which is not the ideal surface for color pencils when attempting to create realistic art, since the bumps and dents of the surface results in grainy lines and coloured surfaces. When the pencil tips are sharp this problem is reduced.

I tried the whites of Faber-Castell Polychromos and Caran d'Ache Pablo (which are oil-based), but the graphite Derwent GraphiTint gave the best result and is probably the cheapest of the three as well. The Derwent has the same feel as the oil pencils, perhaps even a little bit more oily - smooth movement over the surface - and its coverage was absolutely great. I haven't tested smooth surfaces yet, but will do so in the near future. My guess is that the Faber-Castell and Caran d'Ache will do better on such surfaces, but I have to experience that to be sure.

The reference photo does not show the top of the girl's head, so I created some more hair there to be able to position her face better on the surface. The photo also lacked detail, but fortunately child's faces have less accents than that of older people. Airbrushing those requires good concentration, because subtle accents are easily messed up. The girl's hair was a different story, half messy (which is what it should be with children) and also difficult to interpret due to the lack of fine detail. This where the Derwent pencil saved me a lot of time.

I started using the Iwata HP-BH and it behaved badly. Checking the needle tip under a looking glass showed a slight kink in the tip. I straightened and polished it after which it performed well again. For the hair, I used the Iwata Custon SB after first polishing its needle. Since I always spray freehand, this top of the bill airbrush was necessary (saves time). The Inspire H2O paints in combination with the Createx 4012 Reducer currently are the best paints /reducer available to spray fine detail. It took me four days to spray - doing all sorts of other chores in between airbrushing.

Oldest stages at the bottom, newest on top as usual.


Virtually framed (using Rhinoceros 3D)


February 29, 2016

Danny Trejo - freehand airbrush portrait

Freehand airbrush portrait of Danny Trejo, work in progress. Started using Vallejo Flow Improver with Inspire H2O. Mix ratio paint : reducer : flow improver = 4 : 12 : 2. The increased viscosity results in less tip dry and slightly longer drying time of the paint, which improve color blend fades. DO NOT use Flow Improver when spraying ultra-fine crisp lines, because the mentioned properties also cause the paint becomes too fluent  after it hits the paper and spreads in all directions, which airbrush artists call spidering. The dimensions of the head are approximately 28 x 28 cm. I used an Iwata HP-BH airbrush and Van Beek Graphic Art Supplies Retouche paper.

Oldest stage below, newest on top. By the way, if you click on one of the images, you will see them against a dark background (in Google's 'lightbox') and will be able to scroll through all photographs on a page by turning your mouse's scroll wheel on a PC or Mac. As usual, below the photos additional information concerning this portrait is presented.


In frame


Reworked in July 2022 in Affinity Photo


Mar 27 2016 - 14:00


Mar 3 2016 - 12:00


Feb 29 2016 - 13:30


Feb 29 2016 - 12:00


Feb 28 2016 - 21:00


Mix-ratio
It occurred to me that a mix-ratio paint : reducer over 1 : 3 doesn't work well with Inspire H2O. For ultra-fine lines 2 drops of reducer for each drop of paint works best. When the paint is diluted beyond the 1 : 3 ratio the paint skids all over the paper surface - the same thing occurs when spraying on canvas. I sprayed this one on wood and acid free smooth paper. It's probably worse on synthetic paper (which I haven't yet tested). But when you stick to the 1 : 2 ratio it is safe; the paint behaves fantastic.

Air pressure
I never look at the dial of the pressure gauge. I just blow air against my hand to find the proper pressure to spray with. I tend to lower the air pressure so that the paint is barely pushed out of the airbrush, but one has to be careful; at some point the airbrush starts to make stipple patterns (which is controllable with intense concentration) and with even lower pressures becomes unpredictable. Also at low pressures, the jet of paint takes a few seconds to stabilize. I keep a small piece of paper in my left hand (I hold the airbrush in my right hand) and after stabilizing 'jump' to the painting surface. I re-stabilize the jet of paint on the small piece of paper very regularly and make sure that the needle is cleaned as often as necessary by taking it out of the airbrush and wiping it clean. Inspire H2O Black Smoke paint stays stable longer than its Base Brown and causes less tip dry, I found out suring spraying.

Removing blots
When a spider forms, it can be removed by quickly dipping the spot with the hand that is not holding the airbrush. This trick leaves no unwanted residue as long as the hand motion is approximately perpendicular to the painting surface. Smearing motion will leave traces.... Mind you, this only works when spraying with very low air pressures that do not deposit a lot of paint on the surface per measure of time.

Working in layers
The master painters of old (dudes like Rembrandt and Vermeer) often used a technique called 'glacis', which means working in transparent layers on top of each other. They knew that working this way created the illusion of depth and allowed subtle color nuances to be achieved that can never be reached in one pass. These tricks that the old masters used, work with the airbrush as well. In fact, the Inspire H2O paints are excellently suited for them. They're transparent, but also have the proper pigment intensity to create great results when working in many layers. It is the exact opposite as T-shirt (speed) painting in which colors are blasted on the tissue in one or two passes at higher air pressures, because the T-shirt fabric absorbs the paint well and spiders will therefore be prevented. But if you like working in more subtle ways on harder and smoother surfaces like paper, airbrush board and canvas, spray in many layers (using a number of different colors).


This is what the cut-out will look like when framed.


February 3, 2016

Charles Bukowski - freehand airbrush portrait

I never read novels, except a few written by Bukowski. His life, for the greater part, has been a struggle - abusive father, severe acne, alcoholism, arrest by the FBI (on suspicion of draft evasion), death of a lover, shitty jobs, publishers that failed to recognize his talent as a writer and poet, divorce and leukemia (which killed him), basically all the type of crap that makes life thoroughly miserable. In some cases that results in interesting facial characteristics, a challenge to airbrush artists.

Newest phase on top, oldest at the bottom. Below the latter is some more text.


Update March 7 2021

Four years after I sprayed this portrait with an airbrush, an Iwata HP-BH airbrush gun and Inspire H2O paint on paper, I digitally reworked it in Affinity Photo. Bukowski had a nicely twisted mind, resulting from the life he was cast into on this planet, that drove him to write hard hitting, strange books and thereby gaining a considerable following of people that probably had strange aspects to their personality as well. Which they carefully hid of course in an attempt to inconspicuously participate in the imposing human society in this dimension.

Affinity Photo has all the tools to allow to apply subtle details to any image that take it to a more elevated level. Artists that got familiar with this type of functionality appreciate the efforts of the developers, who most likely are artists themselves, given the perceptive properties of the program's features.


August 21 2021 - Colour overlay
added in Affinity Photo


August 21 2021 - Halftone filter
added in Affinity Photo


August 21 2021 - digitally edited
in Affinity Photo


March 7 2021 - digitally edited
in Affinity Photo


Feb 10 2016 12:00 finished


Feb 8 2016 12:00
Almost done. Charles Bukowski freehand airbrush
portrait. Only white highlights on skin and hair (this
will reveal how well Inspire H2O Base White works)


Feb 7 2016 20:30


Feb 6 2016 12:30


Feb 5 2016 23:00


Feb 5 2016 17:00


Feb 5 2016 15:00


Feb 4 2016 16:30


Feb 3 2016 21:00


Feb 3 2016 18:00


Feb 3 2016 14:00


Learned a lot while making this portrait. Diluted the paint as follows: Inspire H20 : reducer = 1 : 6. But in order to avoid having to spray with white too much (highlights and hairs) it will have to be diluted even more. This makes it necessary to spray more layers, which will take more time, but also give the painting more depth while allowing me more control over the intensity of areas and lines. I asked the mega talented Italian airbrush artist Luca Roccaforte once how he (and Alberto) sprayed the fine hairs in a fur and he told me they spray around it... It requires a lot of focus, control and time (patience), but it probably is the only way to avoid spraying the highlights and hairs with white over previously sprayed colors in order to prevent the infamous and irritating blue hue.

The paint I used (obviously) is Inspire H2O, the airbrush Iwata HP-BH and paper Van Beek Retouche paper - image size just under 30 x 30 cm. It would be a lot easier to spray a larger image, but there's no challenge in that. Also using solvent based paint would allow spraying of finer lines and less clogging, but it's not recommended for indoor use.

Photographs are shot with Samsung S4 Mini cellphone cam. It explains the low quality of the images. There is a noticeable difference between photos shot in daylight and in artificial light. All the different settings in Samsung's standard cam app and an app called 'A better camera' were unable to produce decent photos.

A note on the dreaded blue hue when spraying with white on top of previously applied colors
Spray around the hairs as Luca explained as much as possible. Accurate spraying of the shadows on and below hairs, minimizes the covering of white over other colors. Things go wrong when the white fades on its edges. When spraying crisp, hard edged white lines, the result is not too bad. Spraying with white as a final process does give the extra accent that makes paintings (especially portraits) stand out. Inspire's H2O is the best I've encountered so far. Mix ratio paint : reducer = 1 : 3 Clean the brush often; the white has powerful adhesive qualities and opacity while allowing to spray ultra fine lines (provided it is cleaned properly and often). To clean the airbrush I used an environmentally friendly organic type cleaner - ASA airbrush cleaner (500cc) from Airbrush Services Almere.

And finally a nice quote from Mr. Bukowski. Those who have more than two properly functioning brain cells should think about his words real f*cking hard:


January 17, 2016

Putin airbrush test

Test freehand airbrush:

• Transfer method ( http://goo.gl/90FjbJ )
• Various reducers
• Highlighting white base paint vs erasing
• Type of paper

Transfer method worked well, but reference must be sharper, more detailed and saturated print for better results.
ComArt reducer did not work well at all with Inspire H2O paint. Vallejo reducer worked excellently. Inspire's own reducer worked best.
Erasing sharp edged white areas and highlights gave better looking result than spraying base white.
Schoellershammer paper blurred ultra-fine lines, while previously used Van Beek Retouch paper (200 grs) worked excellently. Paper size: A4.

Test required 27 drops of H2O paint = 162 drops of reducer.


Jan 17 2016 - virtually framed


Crop of completed airbrush test


The size of this test portrait is A4 (210 x 297 mm). It's not very difficult to airbrush lots of details in a huge painting, but it is a challenge to do the same in a small painting. I actually changed Putin's facial expression and made him look slightly more sarcastic. Compare the airbrush with the reference image you see below. The airbrush portrait could have been taken into more detail, but since this is a test, I stopped at the level that is visible above.