November 1, 2020

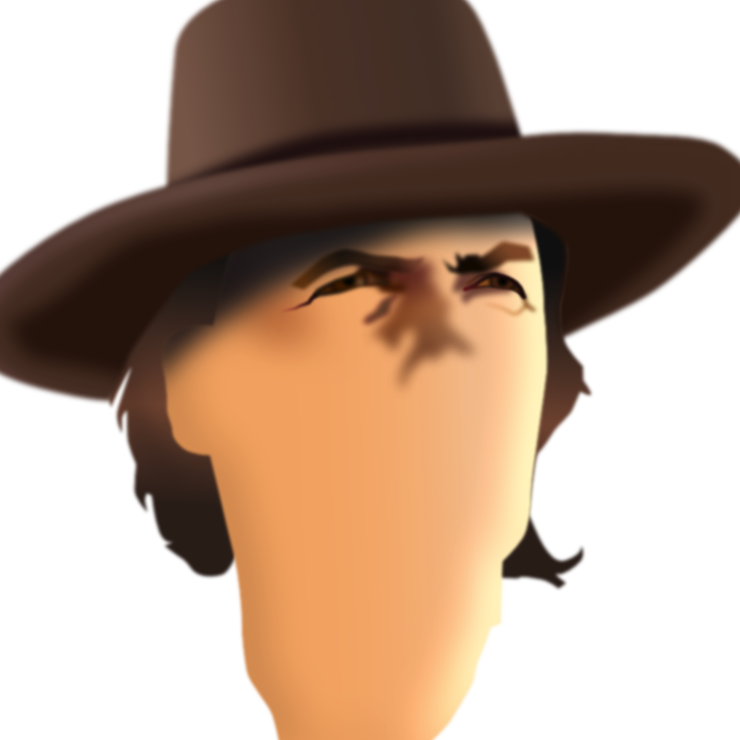
Clint Eastwood in vector T-shirt design


This is a vector portrait of Clint Eastwood created in Affinity Designer. 100% vector, zero pixels. It is a graphical portrait, i.e. it shows his face basic features, without too much details, such as pores, wrinkles and hair texture etc. I may add them some time in future, but for now this is good enough for its current purpose - a T-shirt design, that is available in Redbubble. Below you see the 6 stage (newest on top, oldest at the bottom). Below that you see the vector wireframe view and at the very bottom the T-shirt design image. Actual size of the portrait is 6000 pixels square. Click one of the images to scroll through the stages with your mouse wheel in Google's lightbox (at least you can do this when watching them on a PC).


Update June 8 2021
Tinkering is shown in Stage x and x+1 before which I did several stages to balance the colours and add details all in vector. Stages x and x+1 contain Affinity Photo pixel effects (lighting + bump maps). The vector part of the portrait was created in Affinity Designer and it was later given a lighting filter (with bitmap) in Affinity Photo to make it less smooth. This Stage x and x+1 images will not be used for the T-shirt design because they contain too much detail for T-shirt print machines to handle. The image can still be output at any desired size after which the lighting filter can be applied to the vector drawing. It still needs some work, but I thought I'd place this stage to see the progress.

The texturing is made as follows: Copy objects from Designer into Photo or export them as a png and open them in Photo. There apply Filter-Lighting. Choose Directional and add Bump Map and tinker with the sliders until desired effect is achieved. Then copy back into Designer and move the object(s) to proper Layer level and check that their size matches the drawing. Make sure the canvasses in Designer and Photo are the same size, then you don't have to resize when pasting them back in Designer (which is fiddly). Working in this way you can decide which parts to texturize and which to keep smooth. It also is possible to texture different parts with different bump maps.


Update June 9 2021
In Stage x+2 the skin texture is applied to the face area only. This is an experiment that is not yet finished. The bump map of the applied lighting filter in Affinity Photo can still be improved, but I will do that somewhere in the time ahead. The nature, size and tiling of the bump map need to be improved, but so far the approach itself seems to be promising. By the way, I was given this method of texturing idea by Rory Townsend who has a channel in Youtube, where he posts excellent Affinity Designer and Photo tutorials. The way I did the Stage x+2 was by copying the basic skin layer from Designer in to Photo, where I applied the (Directional) lighting + bump map lighting filter and then copying the result back into Designer in the proper layer rank. The bump map was an image of skin pores.


Stage x+2


Stage x + 1


Stage x


Stage 6 


Stage 5 


Stage 4 


Stage 3 


Stage 2 


Stage 1 


Vector wireframe view (of stage 6)


Used in T-shirt design 

October 24, 2020

I'm not strange, I'm just not normal - Salvador Dali


I currently am in the process of setting up a T-shirt shop (called CommuniCats) at Redbubble. My most recent work (October 24 2020) is in this blog entry. As usual the progress sequence of this vector drawing / portrait is shown. Of course created in Affinity Designer. I chose to make a graphical portrait and omitted the texture details, such as pores and wrinkles or hair strands, that would make it more realistic, because this simply isn't necessary for a T-shirt design. In addition the version 1.9.0.815 with which this image was created had a problem with the vector brushes, but hey, this is a Beta version; it will soon be resolved as Serif is accustomed to do. Below is the final product:


Update Febuary 10 2021

Did some more work on the skin texture, using more custom-made intricate vector brushes. In the Affinity forum someone said creating realistic pores and wrinkles could not be done without spending a huge amount of time drawing and tweaking. I think however the editing time can be reduced by creating special vector brushes, while keeping the possibility to rescale the image to any desired size without loss of quality. When Affinity decides to include the feather function in Designer, things will even get better. Then I could create for instance a skin texture intensive portrait like that of Willie Nelson in approximately the same time as it took me to paint it in pixels. Compare this to mesh vector portraits that often require several months to draw, while editing them afterward is a pain. See the image below and look at them in Google's lightbox by clicking on the image to see the improvements. In the lightbox you can flick though the images by using the mouse's scroll wheel and visually compare the various stages.


Update Febuary 6 2021

More skin texture added (image below). It is what I often do; create a vector drawing up to some point, leave it for months (in this case unedited since October 2020) and add more detail, that I failed to see earlier. I intended to have this image printed on aluminium with clear lacker layers on top before Corona to take to fairs and art exhibitions, but life has somewhat changed since then. The drawing could still use some tweaks, I'm sure, but I'll get around to doing that in a few months from now probably.


Below this paragraph you see yet an other update drawn a few months after I created the previous stage, created in version 1.9.0.932 of Affinity Designer. I added skin texture with custom-made vector brushes and worked on some accents to make the portrait more radiant.


The final portrait on which the design is based, without the background and text, looks like the image below. Those of you familiar with the way Dali looked, will notice that I combined a portrait shot at a certain age with that of one in his younger days, more in particular his hair style to give the design a unique appearance.


The previous stages look like the images below; the oldest one at the bottom and the newest one on top. At the very bottom you see a vector wireframe view of the latest stage of the portrait. To swiftly flick through the stages, click on one of them - which will show them in Google's Lightbox - and turn the scroll wheel of your mouse in order to see the various stage.


September 27, 2020

Vecor drawing of tiger


I was drawing a different artwork in which I decided to add this tiger. While creating the big cat I thought it might be a nice piece by itself. It is all vector, zero pixels, drawn in Affinity Designer. So far (Sept 27 2020) the base has been drawn. I will probably add the tiger's fur later, using my Huion tablet. Oldest stage at the bottom, newest on top. A good design takes time, including the time to distance oneself from the creation to apply better contemplated and less biased changes / improvements at a later time. As far as I'm concerned anyway.

The most recent stand alone tiger, does not fit the sequence chronologically, but that was because I edited the embedded tiger in the poster image and later created a new file of the embedded tiger. Being an artist sometimes can be complex and confusing. But that probably goes for countless other people as well. Most of whom think they're at the top of the food chain, which isn't always a correct interpretation. A view for instance, that will certainly be discarded when confronted with a hungry tiger. It is an inexorable fate determined by nature; carnivores are predators that must kill to live. Humans excepted, because they kill whenever they can invent a reason to kill. Such is the nature of man. This predatory propensity brought tigers to the brink of extinction. 


Stage 7 experiment 3 - Oct 01 2020 - 00:42 hrs


Stageless T-shirt design  


Stage 5 experiment 1 - Oct 01 2020 - 00:42 hrs


Stage 3 - Sept 27 2020 - 10:00 hrs


Stage 2 - Sept 26 2020 - 21:00 hrs


Stage 1 - Sept 26 2020 - 10:00 hrs


September 10, 2020

Cartoonish vector T-shirt design


While creating a collection of T-shirt designs, I sort of accidentally started a creating a cartoonish vector design that I never intended to draw. The program I used is of course Affinity Designer. During the process of progressing I began adding more detail, which can easily become an almost never ending treat that will only be limited by the amount of space that is available. I clipped the square drawing in a circle since this is the trademark signature for my T-shirt designs that allows me to a circular text around the image.


The top image can be viewed in Google's Lightbox by clicking on it when you're on a PC or Mac (this does not work on tablets and phones) and the image opened there can be viewed in a new tab by right clicking on it to see it's original size, which is smaller than the file that will be used to the T-shirt print, that results in making more detail visible. Click on the image again (with the magnifying glass containing the plus symbol) to view the image actual size.


September 2, 2020

Setting up an online T-shirt shop


At this point I am in the process of creating a collection of T-shirts that I plan to sell online. I have many great ideas that I have turned into designs, while there are many more to come. Although the shirts still need to be placed online, I have an overview of the products in my website. You can take a peek at them by clicking here. Below you see examples of the shirts I have drawn. Besides shirts I have planned to sell stickers, offer logo design services and digital (vector) portraits and paintings.


Click the images above to visit the T-shirt department on my site. Be sure to visit my website regularly to browse and / or buy my products online and see the new entries I have created.


July 24, 2020

Elvis Presley Vector portrait


This is an other vector portrait of Elvis Presley, the king of rock and roll, but rumoured to be less noble in other departments, like many celebrities that were different persons off camera than when performing on stage, award festivals or attending some of their extravagant parties. The portrait is all vector, zero pixels, created in Affinity Designer. It is a much more simple than the previous project - the vector portrait of David Bohm - containing almost exclusively vector shapes and no vector brush strokes (except for the hair). I could probably have completed the image in one day, had I continued working on it, but I like to take my time to finish such works. At stage 3 I estimate I spent 5 hours on the portrait.

I utterly dislike the usual vector portraits that have hard edged adjacent shapes of different colour instead of natural gradients in parts of the face. Many years ago I tried creating realistic portraits in CorelDRAW and was forced to use the ultra tedious mesh colouring, which I absolutely hated, to get a result and was very happy running into Affinity Designer by accident. The same mesh colouring is required in Adobe Illustrator to draw realistic vector portraits. Only in the free open source Inkscape program was I able to get a reasonable result - not using the mesh thingie - without working months in a row on one portrait, but its interface was rather difficult to understand.

But in Affinity Designer the mesh misery is not needed and working with shapes that are Gaussian blurred, to which many fx is applied, allows much much faster editing (also afterwards) of both the shapes and colours than in the mesh ordeal of other programs. Affinity Designer allows artists to go crazy as they want in detailing, but could use some increased stability when ultra large and complex documents are being created, which I'm sure will be the case in the near future, given the sincere approach of the developers I noticed in the Affinity forums. You may want to take a peek at the Vector Page in my website to get a good idea of drawing vector portraits with Affinity Designer.

While drawing the David Bohm portrait the program crashed often in the later stages, probably because of the portrait's (very large: 4 x 4.7 metres) size and complexity (well over a thousand layers). Bear in mind that Affinity Designer is still in Beta stage at this point. Over time the developers have added many functions and corrected a ton of bugs, so I am confident they will be able to create a stable program, even for off standard project as I usually make.

The oldest stage at the bottom and newest one on top. I recommend clicking one of the images below to view them in Google's lightbox, that allows you to quickly flick through the various stages by turning the mouse wheel (when viewing them on a PC at least) to spot the differences between the stages. And please bear in mind that the image size is lowered by over 70% and that Google downsamples the image in addition.

Update Jan 6 2022
The Gaussian blurring and object clipping techniques, used to create this vector portrait are explained in more detail in a brief tutorial, called 'How to avoid hard edges in vector portraits', that you find here:


Stage 6 


Stage 5 


Stage 3 


Stage 2 


Stage 1 


July 11, 2020

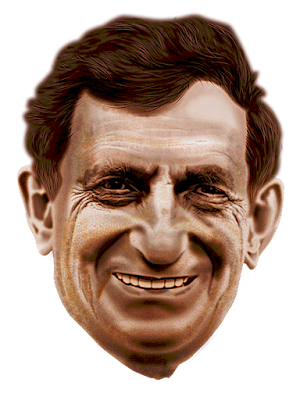
Vector portrait David Bohm


The late great David Bohm chose his own path through life and as a result got plenty resistance from the established that care more for their careers and opinions of their complicit peers than making a sincere effort to advance the progress of science. His father did not approve of him chosing a career in science and turned him a cold shoulder. Years after he was betrayed (twice) by his substitue father Oppenheimer and chased by the zealot McCarthy which coerced him to move to Sao Paolo, Brazil where he conceived the beginnings of his Hidden Variables theory, which could lead to both the theories of relativity and quantum mechanics being whacked at some point in time by using a different type of reasoning. It does away with science simply ignoring facts that allow it to uphold the mainsteam theories.

After having accepted a job offer in Israel where he worked several years, he moved to the UK, where he began collaborating with Basil Hiley. They contributed to solve the double slit mystery, which they visualized in an animation, based on the mathematics underlaying their theory. It proved the particle / wave duality theory was invented bunk that only served to maintain quantum mechanic's theoretical twaddle concerning the matter. His involvement with Krishnamurti allowed him to bridge science and spirituality (consciousness). David Bohm passed away in 1992. This portrait is my visual tribute to a great mind that was not afraid to make great efforts at the cost of great sacrifice.

I am drawing this portrait in Affinity Designer in which it is possible to draw realistic organic shapes, which is not easily done in programs of the competition that is hugely more expensive than Designer (Inkscape excepted, but that program has a difficult to figure out UI). I used a mix of drawing methods in this work that I sorted out in previous attempts to draw realistic vector portraits:
  • 'painting' with custom made vector brushes (mainly textures and creases)
  • drawing strokes and shapes to create realistic parts of the face (as a base to apply texture on in a later stage), including clipping objects inside objects on mulitple levels to create gradients that fx options, the colour gradient tool and custom transparency are unable to achieve
  • The hair was drawn with the Huion H610 Pro graphic tablet

The size of the portrait is rather big - 4.7 x 4 meter (....) which perhaps is the reason Affinity Designer crashed a number of times. I maximized the measure of RAM reserved for the program and reduced the number of undos from 1000 to 120 In the prgram's Preferences - Performance in an attempt to prevent crashing, but that didn't seem to make a difference. The number of layers / objects is high into the hundreds. So now, I save very often on two physically different hard drives to reduce the chance of data loss.

At this point (July 16 2020) the portrait obviously still is a work in progress. So stay tuned to see it being developed for as far the crashing allows me to do. The oldest stage is at the bottom, the newest on top. Click one of the images to go to see them in Google's Lightbox in which you can flick through the stages by turning your mousewheel (at least on a PC that is an option).

Update July 17 2020
The new Beta version 1.8.4.681 seems to be more stable. No crashes while adding the hair, which contains numerous curves / objects. Also adjusting the artboard - centering the face better - worked which was not possible to do with the previous version that distorted the image. Kudos to the Affinity Designer developers.


Update Jan 24 2022


Update May 12 2021


Update July 18 2020


July 15 2020 - Experiment with noise


Update July 14 2020


Update 2 July 13 2020


Update 1 July 13 2020


Update 3 July 12 2020


Update 2 July 12 2020


Update 1 July 12 2020


Update July 11 2020


Update 4 July 9 2020


Update 3 July 9 2020


Update 2 July 9 2020


Start of the drawing July 9 2020


July 8, 2020

Vectorwhiz portfolio booklet


I have created a new portfolio in pdf the you find here, that you can download to view offline. The file size is 28 MB, so slow connections may need some time to download the document. I have resampled the images to 144 DPI (original resolution is 300 DPI) so that download time is limited while the appearance of the images remains acceptable.


Front cover page


This 88 page booklet was created in Affinity Publisher and contains:

  • vector portraits
  • vector paintings
  • vector illustrations
  • vector logos
  • vector T-shirt designs
  • pixel portraits
  • pixel paintings
  • 3D illustrations
  • 3D vector technical drawings
  • creative text - poetry


In the footer of each page in the document you find links to the TOC (table of contents) for easy navigation and a link to my website. The vector images were created in Affinity Designer, the pixel images in Affinity Photo and the 3D images in a 3D program named Rhinoceros v5. The poetry texts I usually create in Libre Office.

Affinity Publisher had trouble with the file for reasons so far unknown, but fortunately I was able to churn out a pdf file before it did. Publisher officially still is in Beta stage at this point, so it makes sense that things are not stable yet. I have good hope though that the developers of Serif (the owner of the Affinity programs) will be able to correct the bugs in a time not too far from now (July 2020).

My website - should you want to pay a visit  [wink wink, nudge nudge] - was made in Mobirise, the latest version of which seems to be much more stable than previous ones. Out of frustration about older Mobirise versions I wrote some unkind words about it (with good cause at the time) a few years back, but the latest version has not given any trouble so far.