Showing posts with label digital art. Show all posts

March 5, 2024

Vector painting of a jaguar


This is a vector portrait of a crouching jaguar, created in VectorStyler and Affinity Designer. At this time - March 2024 - it still is a work in progress. VectorStyler I used to create the majority of the spots, using the Spikes shapes effect, which shapes the outline of an object into a spiky line, that can be controlled. In Affinity Designer I did the composition and tweaking. Vector objects can be copied and pasted between the two programs, which is a time saver, since Vector Styler has a ton of tools that are not incorporated in the programs of the competition.

Everything mentioned above was drawn with the mouse. The final touches - the hair strands - will have to be drawn and I plan to do it with my old Huion 620 Pro drawing tablet (in vectors too), because I intend to keep this image a 100% vector drawing. The oldest stage is at the bottom, the newest on top. Click on an image to see a larger version of it in Google's Lightbox. In there you can also scroll through the stages on a PC. I used a ton of tricks to create the desired effect. In a multi layer drawing as this one, that contains a large amount of objects, it is best to use the Spit Screen View in Affinity Designer to select and / or reshape objects to save a huge amount of time. This paragraph also is in the bottom section of this blog entry. Most objects are given gradient fills, transparency, layer effects and Gaussian blurs to avoid the proverbial had edges typical for vector drawing programs. This makes images drawn in such a way appear to be very unrealistic.

Please check in every now and then to see the progress of this drawing.


Vector outline

The vector outline view shows the contours of objects and strokes - what actually is drawn - without fills and effects applied. Below this paragraph is the vector outline view from the stage before adding the fur structure that would dominantly hide parts of other objects, since it literally shows a plethora of objects. At this stage the outline view without the many strokes of hair still gives a rough idea how the drawing was set up. It also presents an idea of how many objects (called Layers in Affinity Designer) were drawn to achieve the desired result, bearing in mind that many objects are stacked on top of each other (most with a different effect or blend), which does not show in the outline view. Drawing the jaguar in vector instead of pixels, allows to resize the image to any scale without loss of quality.


Multiple object / layer selection in Split Screen View

When a drawing contains hundreds or thousands of objects / layers, selecting a particular one is difficult. The only effective solution to this problem is to work with a Split Screen View in Affinity Designer, which makes selecting less cumbersome, especially when the drawing contains many nested (objects within objects to various levels) layers. The image below shows what this looks like.


Jaguar in a virtual 3D frame

I often place my vector 2D images in a virtual 3D frame to see what it would look like, using the Plasticity 3D program to draw the frame, to see if the placement of the composition is off, before having it giclée printed, which is a special fine art way of printing with a high resolution (up to 6800 dpi and a 100 year of quality preservation). If cropping and / or alignment isn't done meticulously, any artwork can be ruined or subconsciously look strange. The image below shows the as of now not yet final stage of March 12 2024.

The vector painting
in a virtual 3D frame


October 6, 2022

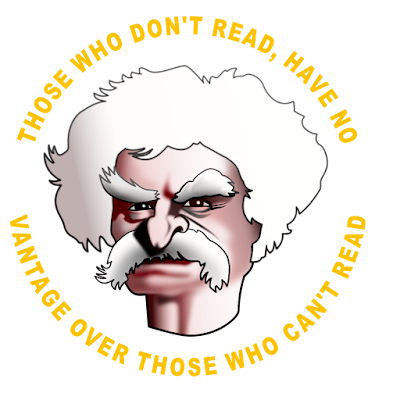
Mark Twain T-shirt design cartoon


Mark Twain is one of the best know and most read novel writers who graced this world with his preseance and works. Years ago I painted a portrait of the man in pixels from scratch in Affinity Photo, which is the Serif company's equivalent (and I mean this quite literally) of Adobe's Photoshop, but at a low one time fee, so artists aren't bound to a hugely expensive subscription model. Even though Photo still misses some minor functions compared to the industry standard, while on the other hand having some that exceed it, Photo is a most excellent alternative for artists that hate being forced to pay a high amount of money every month to purchase the 'alleged privilege' to use it.

But Serif has also created a magnifient alternative for Adobe Illustrator, a vector program that - like Photo - misses a number of functions, that it amply compensates with different functions that are not included in Illustrator. Creating various level of hard / soft edges around an object being the most interesting for artists who dislike the unnatural hard edges many vector programs offer. The type of artist I am referring to, prefers to create more realistic art, in which had edges are mostly absent. This program is named Affinity Designer, my favorite program, since quite often I create realistic portraits in it (the progress sequence of which can be seen in this blog).

While normal people on average use about 3000 different words to communicate, Twain used approximately 8000 words in his books most of the time. Expressing himself with such an extended verbiage allowed him to say and write things that makes people wonder at least and feel mind blown in other cases. Even the most simple and basic things of life he managed to craft into small or impressive literal miracles, simply because no one ever before had the idea to express them in the eloquent way that became his trademark manner of writing.

One such quotes I used to create a cartoonish image of Twain, around which I placed his words. It is an all vector image, created in Affinity Designer of course. Below you see the different phases of the cartoon portrait, including the misinterpretations that were in them before reaching the end result. Google's Lightbox can be accessed to see the various stages, by clicking on an image. On a PC or Mac it is also possible to scroll through the images, using the mouse wheel, which allows to see the changes in the stages more clearly in Lightbox. Newest image on top, the older ones below that.


September 19, 2022

Emojis


Here are a few emojis drawn by me in Affinity Designer, so they are all 100% vector. I did not want to make flat images without gradient colours and tried to mimic human facial expressions, of course exaggerating them somewhat. Exaggeration - imagining the extreme aspect of things - often helps to see the possible consequence of seemingly innocent thoughts, developments and policies. The one at the top is a T-shirt design, the rest below it are just plain emojis. In the captions below each emoji are links to alternative versions of the emojis shown here; you might want to take a peek.... 😄


T-shirt design and a
version for evil people


Wink
for other opinions


Devious
for out-of-the-box-thinkers


Grin
have nothing to hide?


LOL
for mainstreamers


Mental
for the annoyed


Erm....
for those who see


August 5, 2022

Vector portrait of Emma Britten

I originally posted this drawing in 2019, but kept on working on it every now and then (which is what I often do). Many artists are familiar with this method of working, because after 'finishing' a drawing, it is more often than not discovered that the image needs more adjusting and / or additional work. At times this is a repetitively occuring moment, especially with portraits, in which likeness can depend on moving objects 1 or 2 millimeters, changing their size or shape, skewing them or fiddling with their colours. Faces are the most prominent visual characteristic of a person, which is why there is not a photo of your foot in your passport or ID card, but one of your face.

Emma Hardinge Britten was a well known spiritualist who lived from May 2 1823 to October 2 1899. She was a writer, public speaker, musician and opera singer in her younger days to support her family after her father passed away when she was 11 years old. Her spiritual gifts brought her fame and she was frequently consulted by high ranking politicians, corporate leaders and other important people of her day. It is an indication that elevated echelons of society value the spiritual reality that is intentionally kept hidden from common folk.

This portrait is a work in progress and is drawn in Affinity Designer. This program has all the functionality to create realistic vector portraits that can be edited afterwards relatively fast which is a pain to do with mesh-filled vector portraits. And since tinkering is almost a necessity for portrait artists Affinity Designer is their ideal tool to make 100% vector portraits that can be re-scaled to any size without loss of quality. However, this work also contains vector brushes, which are not really vectors - more about this later.


Had to place this here or else the ugly
image below will show up in preview


What makes vector portraits look realistic is that edges of shapes and lines can be blurred in a controlled way. In addition color fadings can be customized in any desired way (using different colours) as well as the transparency of objects (in a linear, radial, elliptical or conical fashion). The combination of these 3 functions allows artists to create works that are visually indistinguishable from pixel portraits, but - as stated before - can be produced in any desired dimension while retaining the original quality.


Ugly Adobe Illustrator attempt (no offence) to
create a realistic vector portrait, b.t.w., this
is caused by Adobe Illustrator's limited
functionality to create realistic art.


Outside of Affinity Designer only the magnificent free open source program Inkscape (which a difficult to learn UI) has similar features, be it that some of them are difficult to find in Inkscape's UI; CorelDRAW and Adobe Illustrator do not have object blur functions, except when converting objects to bitmaps first, and can not be converted back into vectors. These programs are therefore not suited to create realistic vector portraits, other than with the hideously tedious mesh-fill tool. The portraits not made with the mesh fill tool are very unrealitsic looking portraits with hard edges, as is shown in the image above. Adobe's marketing department has tried to turn this into the standard for vector portraits (in which it obviously succeeded) by suggesting that the programs shortcomings are some sort of artistic oddity that they turned into an alleged type of feature. But no matter how one looks at the result, these are not realistic portraits of high quality; they are at best a visual metaphor of realism.


This is the custom vector brush
created to draw realistic strands
of hair. This can be imported in
your collection of brushes and
used for this specific purpose.


This is the custom made brush used
to paint skin pores. Mix dark strokes
and bright strokes combined, the latter
always on top in the layer panel.


Apply 3D and or Bevel / Emboss fx
to the textured brush strokes to
create a realistic skin pore texture
and fiddle with the brush properties
use custom colour and transparency
overlays and underlays, whatever it
takes to approach realism as much
as reasonably possible.


So below you see a realistic vector portrait created in Affinity Designer. Bear in mind that at this point (September 2019) you are looking at the early stages; it will become more realistic as more work is done to the image. Skin pores and detailed strands of hair in particular will be applied. For the hair texture I created a custom brush that allows to create realistic strands, both dark and bright. The oldest stage is at the bottom - more recent stages are placed above that. Click on one of the images and they will be shown in Google's Lightbox, which (on a PC anyway) allows to scroll through the various stages to quickly see and compare the changes. The original size of the portrait in which it was drawn, is 80 x 62 cm, approximately ten times larger than the images submitted to this site.

Mind you - as I found out later - vector brushes in Affinity Designer do NOT create vectors, but are pixels created inside of a vector drawing program, that will remain bitmaps. So when creating realistic art with Affinity Designer, be sure to make large images in order to avoid blurring and jagged edges when using 'vector' brushes, if the intention is to make large prints of the image.


September 20 2019 00:09 virtually in 3D frame


September 20 2019 00:09


September 16 2019 stage 12
vector curves & Brush strokes
outline view (hugely helpful
in the process of drawing)


September 12 2019 11:50


September 11 2019 11:01


September 10 2019 17:20


September 9 2019 20:13


September 9 2019 16:43


September 9 2019 12:20


September 8 2019


September 8 2019


September 8 2019


September 13, 2021

Apache logo - vector art


Years ago I was mainly into creating airbrush art, with various types of airbrush guns and paint. I used the Paasche V1, Paasche Turbo and in rare occasions the Fischer Aerostar. The paints I used were Illu-Color and Holbein acrylics. My favorite subjects were Native American Chiefs and warriors. All freehand airbrushes, i.e. without using masks. I did many demos on art fairs for Revell, promoting the Vega 1000 airbrush and Revell paints. At one point one of the sales persons asked me: 'Do you ever airbrush something different than indians?' Of course I did, but not during demonstrations, because it was sure to draw a crowd. I was - and still am - fascinated by Native American culture, their way of life, wisdom and sadly horrific oppression by invading western armies and colonists.

Some 10 years ago I switched to digital art creation, because of the countless undo functions that way of art creation allows, along with the endless tinkering it makes possible. In addition digital printing has soared in the last decades, which allowed me to print art work on many different surfaces (canvas, paper, aluminium etc.), while applying all sorts of lacquer layers to create magnificent effects. But once and a while I think back at those analog days and my favorite subject: Native American art. Below you see one of my most recent, simple digital vector creations that was used for T-shirt print. It was drawn in Affinity Designer.


Apache logo


August 19, 2021

Geronimo - from analog airbrush to digital art


In the previous century I was deeply involved in the Dutch airbrush scene and sprayed a lot of portraits, in which a returning preference was the airbrushing of Native American chiefs and warriors. Some of those portraits were not finished or could use improvement. After the turn of the century I leaned more towards creating digital art and not too long ago I decided to rework the old portraits with digital means. One of those is the portrait of the famous Apache chief Geronimo of which you see various stages below.

While airbrushing with airbrush guns and paint I usually used the Iwata HP-BH airbrush gun and various paints, mainly Illu-Color and later Inspire H2O waterbased paint. In the digital episode of my life I initially used CorelPaint until that program began to crash more often than not, particularly when exporting work to the png format from Corel's cpt format. Some 5 years ago I accidentally ran into the Affinity suit and changed to Affinity Photo for pixel editing.

I gave the document a look that suggests a canvas background in Affinity Photo that I thought matched the portrait better. This is easy to do in Affinity Photo by using various Filters and Layer Effects. Digital art creation allows to make many different versions with different feel relatively easy, while printing techniques have evolved to a stage that makes it difficult to distinguish analog from digital art. In the case of this portrait I could for instance, choose to have it printed on canvas and give it a lacquer layer, which would give a convincing impression of authenticity to the observer.

I still like to pick up the Iwata's every now and then, but today my main focus is on digital art creation. It is an entirely different way to work, but unlike many airbrush purists, I like to endlessly fiddle in the software that allows to infinitely apply changes without the headache that that the traditional analog trade forces artists to make. The oldest stage - the unfinished analog airbrush - is at the bottom and the various digital tinkerings are above that. Click on one of the images to see them in Google's Lightbox that allows to flick through the images by turning the mouse's scroll wheel.


Fourth digital stage


Third digital stage


Second digital stage


First digital stage


Unfinished analog airbrush portrait


July 11, 2020

Vector portrait David Bohm


The late great David Bohm chose his own path through life and as a result got plenty resistance from the established that care more for their careers and opinions of their complicit peers than making a sincere effort to advance the progress of science. His father did not approve of him chosing a career in science and turned him a cold shoulder. Years after he was betrayed (twice) by his substitue father Oppenheimer and chased by the zealot McCarthy which coerced him to move to Sao Paolo, Brazil where he conceived the beginnings of his Hidden Variables theory, which could lead to both the theories of relativity and quantum mechanics being whacked at some point in time by using a different type of reasoning. It does away with science simply ignoring facts that allow it to uphold the mainsteam theories.

After having accepted a job offer in Israel where he worked several years, he moved to the UK, where he began collaborating with Basil Hiley. They contributed to solve the double slit mystery, which they visualized in an animation, based on the mathematics underlaying their theory. It proved the particle / wave duality theory was invented bunk that only served to maintain quantum mechanic's theoretical twaddle concerning the matter. His involvement with Krishnamurti allowed him to bridge science and spirituality (consciousness). David Bohm passed away in 1992. This portrait is my visual tribute to a great mind that was not afraid to make great efforts at the cost of great sacrifice.

I am drawing this portrait in Affinity Designer in which it is possible to draw realistic organic shapes, which is not easily done in programs of the competition that is hugely more expensive than Designer (Inkscape excepted, but that program has a difficult to figure out UI). I used a mix of drawing methods in this work that I sorted out in previous attempts to draw realistic vector portraits:
  • 'painting' with custom made vector brushes (mainly textures and creases)
  • drawing strokes and shapes to create realistic parts of the face (as a base to apply texture on in a later stage), including clipping objects inside objects on mulitple levels to create gradients that fx options, the colour gradient tool and custom transparency are unable to achieve
  • The hair was drawn with the Huion H610 Pro graphic tablet

The size of the portrait is rather big - 4.7 x 4 meter (....) which perhaps is the reason Affinity Designer crashed a number of times. I maximized the measure of RAM reserved for the program and reduced the number of undos from 1000 to 120 In the prgram's Preferences - Performance in an attempt to prevent crashing, but that didn't seem to make a difference. The number of layers / objects is high into the hundreds. So now, I save very often on two physically different hard drives to reduce the chance of data loss.

At this point (July 16 2020) the portrait obviously still is a work in progress. So stay tuned to see it being developed for as far the crashing allows me to do. The oldest stage is at the bottom, the newest on top. Click one of the images to go to see them in Google's Lightbox in which you can flick through the stages by turning your mousewheel (at least on a PC that is an option).

Update July 17 2020
The new Beta version 1.8.4.681 seems to be more stable. No crashes while adding the hair, which contains numerous curves / objects. Also adjusting the artboard - centering the face better - worked which was not possible to do with the previous version that distorted the image. Kudos to the Affinity Designer developers.


Update Jan 24 2022


Update May 12 2021


Update July 18 2020


July 15 2020 - Experiment with noise


Update July 14 2020


Update 2 July 13 2020


Update 1 July 13 2020


Update 3 July 12 2020


Update 2 July 12 2020


Update 1 July 12 2020


Update July 11 2020


Update 4 July 9 2020


Update 3 July 9 2020


Update 2 July 9 2020


Start of the drawing July 9 2020